Difference between revisions of "Raspberry Pi and Sensors"
| Line 83: | Line 83: | ||
*Can you loop over this code continually? | *Can you loop over this code continually? | ||
*Can you average the last 3 values | *Can you average the last 3 values | ||
| − | *I experienced some anomalies where I would occasionally get values of ~3000cm. Can you implement | + | *I experienced some anomalies where I would occasionally get values of ~3000cm. Can you implement an outlier detection? |
== Creative Thinking == | == Creative Thinking == | ||
Revision as of 02:55, 6 October 2020
The Ultrasound sensor
In this activity, we are going to integrate an HC-SR04 Ultrasonic Module Distance Measuring Sensor to measure distance. Modern self-driving cars can use ultrasonic in conjunction with other sensors which may include radar, cameras, GPS and potentially LIDAR. In some cases, ultrasonic sensors can be more reliable than other proximity sensor for detecting movement in an area, such as the presence of a person in a room.
Note, this activity was designed based on the guide here
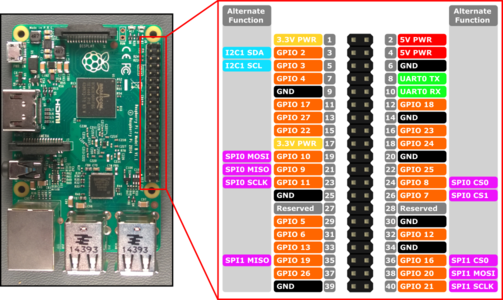
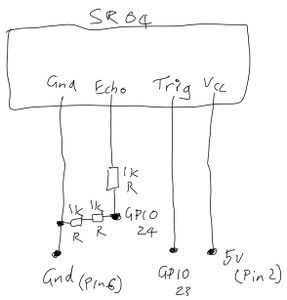
Let's get started by referring to the Raspberry Pi pinout. Then, carefully examine the circuit diagram that we will be using below.
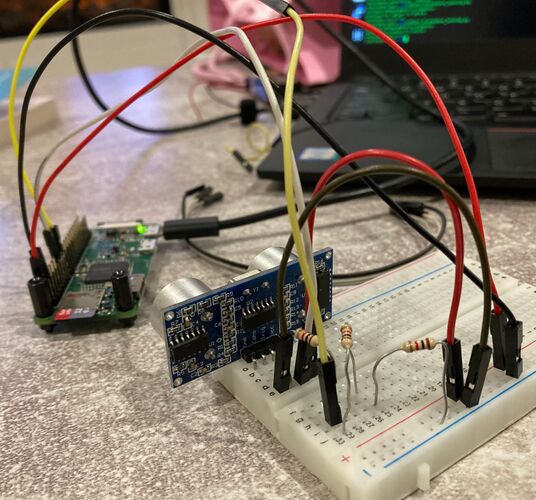
Finally, examine the picture, of my SR04 wired up, below to confirm your understanding. You may want to click on it to get a high res version. Note that to reduce the number of resistors we were required to purchase, I have used 2 x 1k Resistors rather than a single 1k resistor.
Please read here for a more thorough description of the electronics used in this activity.
Put simply, ultrasound relies on sound waves, so picture a speaker making a sound wave that hits a surface and reflects back and is then received by a microphone. The sounds are not audible to us as they are a higher frequency than we can hear.
These ultrasound sensors will measure the time duration between when the ultrasound signal is sent out, and when it is received back. Working out the distance of the object from the sensor will require us to understand the speed of sound.
The speed of sound is 343m per second. Now the unit we are using is cm so let's multiply 343 by 100 to get to cm, so 34300. Now, the signal we will send out will need to hit a surface and bounce back so to prevent the distances from appearing twice as far, lets divide 34300 by 2 to get 17150.
Now that you understand where that value is coming from, read the Python 3 code below and see if you can get an idea of what is going on.
The Python 3 code
#!/usr/bin/python3

import RPi.GPIO as GPIO
import time

GPIO.setmode(GPIO.BCM)

TRIG = 23
ECHO = 24

print("Distance Measurement In Progress")

GPIO.setup(TRIG,GPIO.OUT)
GPIO.setup(ECHO,GPIO.IN)

GPIO.output(TRIG, False)

print("Waiting For Sensor To Settle")

time.sleep(2)

GPIO.output(TRIG, True)
time.sleep(0.00001)

GPIO.output(TRIG, False)

while GPIO.input(ECHO)==0:

  pulse_start = time.time()

while GPIO.input(ECHO)==1:

  pulse_end = time.time()

pulse_duration = pulse_end - pulse_start

distance = pulse_duration * 17150

distance = round(distance, 2)

print("Distance:",distance,"cm")

GPIO.cleanup()
Use the code above and your favourite text editor, and save it as distance_sensor.py, then run.
python3 distance_sensor.py
Make sure you play around with distances to ensure your sensor is working properly.
Challenge
- Can you loop over this code continually?
- Can you average the last 3 values
- I experienced some anomalies where I would occasionally get values of ~3000cm. Can you implement an outlier detection?
Creative Thinking
Look back through the IFTTT labs that you did earlier in the semester:
Could any of these triggers (this) OR actions (that) fit together with anything that you have seen or worked with on the Raspberry Pi?


