Difference between revisions of "Windows Server Virtualisation"
| (6 intermediate revisions by the same user not shown) | |||
| Line 50: | Line 50: | ||
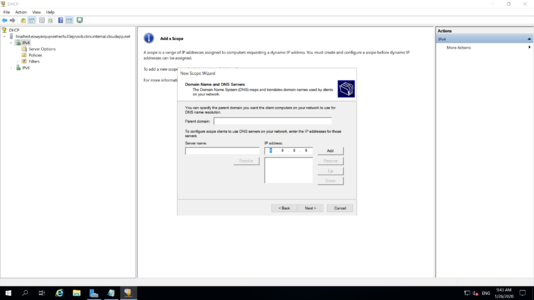
[[File:add_dns_server.png|thumb|x300px|alt=Add DNS Server|Add DNS Server]] | [[File:add_dns_server.png|thumb|x300px|alt=Add DNS Server|Add DNS Server]] | ||
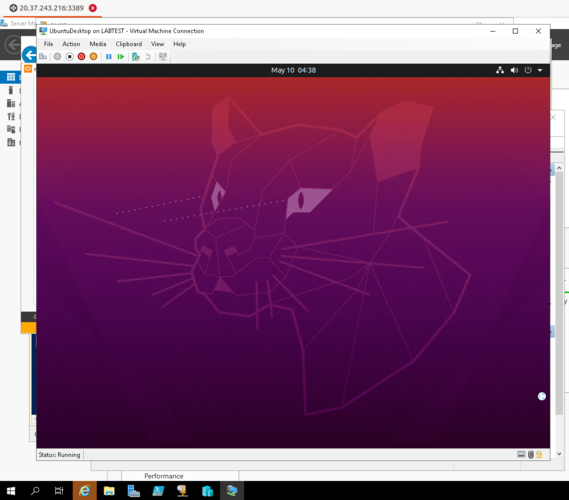
| − | + | [[File:Windows_HyperV_running_Linux.png|thumb|left|x500px|alt=Windows Hyper V Running Linux|Windows Hyper V Running Linux]] | |
== Hyper V Machine install == | == Hyper V Machine install == | ||
| − | |||
Click the start menu then type and open Hyper-V. Click on your machine's hostname to see the management panel. | Click the start menu then type and open Hyper-V. Click on your machine's hostname to see the management panel. | ||
| Line 64: | Line 63: | ||
Under Installation Options, choose to Install an operating system from a bootable CD/DVD drive then browse for and choose a .iso file. Windows will have downloaded to the Downloads directory. | Under Installation Options, choose to Install an operating system from a bootable CD/DVD drive then browse for and choose a .iso file. Windows will have downloaded to the Downloads directory. | ||
| − | At this point, you should have been returned to Hyper-V | + | At this point, you should have been returned to Hyper-V manager. Double click on your ubuntu Virtual Machine to start the installation process via the media you just provided. Then finish and install the Ubuntu operating system. Follow the prompts and login. |
Once you have installed Linux, test the network connection. | Once you have installed Linux, test the network connection. | ||
| Line 70: | Line 69: | ||
== Make sure you Terminate the Image at the end == | == Make sure you Terminate the Image at the end == | ||
| − | The Windows image that you have launched could be very costly if left on so do make sure that you have terminated it at the end of the lab. Make sure that you double-check that both the virtual machine and the volume/disk | + | The Windows image that you have launched could be very costly if left on so do make sure that you have terminated it at the end of the lab. Make sure that you double-check that both the virtual machine and the volume/disk have been removed. |
Latest revision as of 08:16, 10 May 2021
While Internet companies that operate a lot of web services typically use Linux, many organisations, managing Desktop environments, use Windows Server for this task. Commonly Windows server will be used for Managing the Windows Domain, including user accounts, permissions DNS et cetera. This is a large area and will be covered in later units.
It is quite common that an organisation may own and run a Windows server machine but will have the need for a couple of Linux machines for specific tasks. Although traditionally, another server would have been purchased, it is often more efficient to simply virtualise a few Linux machines on Windows server.
In this lab, you will be shown how Windows Server can be used to virtualise Linux. To run Hyper-V, which is the Windows Virtualisation platform we will use Microsoft Azure. This will also show you an alternative to Amazon EC2.
Contents
Azure Sign up and Server Launch
Sign up for an account with free credits at: https://azure.microsoft.com/en-us/free/students/. If you have already done this step then you should be able to log straight in at: https://portal.azure.com
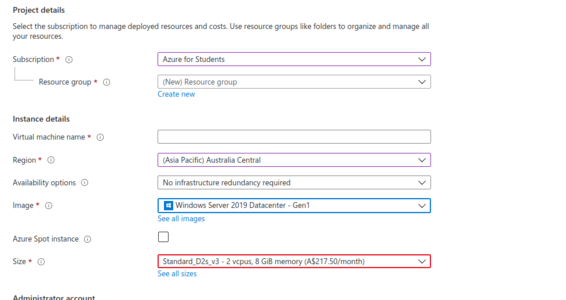
Once you have an account and are logged in, you should click on Virtual Machines then add. Launch a Windows Server 2019 Data Centre image and set an admin username and password. Allow HTTP and RDP inbound ports. A final aspect that is very important for this lab is that you launch a D2s_v3 image. The reason is that this image size will allow you to virtualise within Windows. Accept the defaults from this point onwards and don't forget to hit the create button to deploy your Windows Server Virtual Machine. It will take at least a few minutes to deploy.
Access your Windows Machine and Install Hyper-V and DHCP Server
Once, the machine has deployed, click on Virtual Machines then select your machine and click connect. Download the RDP file and load it in your RDP client. Use the username and password you just created then.
The machine should start with the Server Manager window open. If it is not open, Click the start menu, then type and open Server Manager.
Then click on add roles and features. Hit next until you hit Server roles then select Hyper-V and DHCP Server. Continue to install Hyper V and the DHCP server, you can accept the defaults and ignore any warnings about static IP addresses for now. Once installed, you may need a reboot.
DHCP Setup
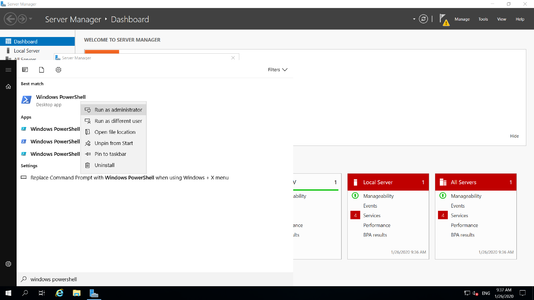
After a reboot, get an elevated privileges PowerShell session. I found that launching Powershell ISE rather than powershell enabled me to copy and paste the following lines.
Paste in the following three lines
New-VMSwitch -SwitchName “NATSwitch” -SwitchType Internal
New-NetIPAddress -IPAddress 192.168.100.1 -PrefixLength 24 -InterfaceAlias “vEthernet (NATSwitch)”
New-NetNAT -Name “NATNetwork” -InternalIPInterfaceAddressPrefix 192.168.100.0/24
This will create a NAT switch that will provide Internet access to the virtual machine running within Windows Server.
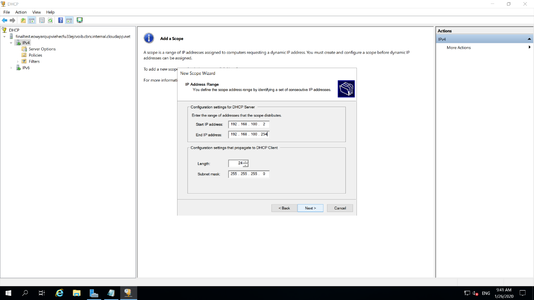
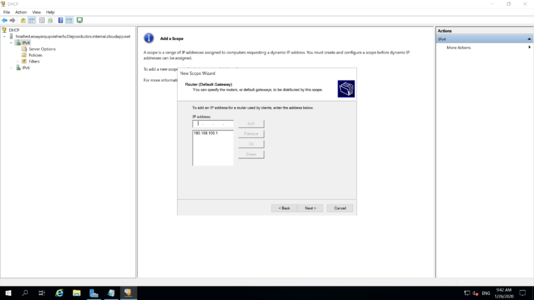
Now, click on the start window and type DHCP. Click on your hostname and then left then right-click on IPv4 and select new scope.
Add the range as shown in the image to the right.
Then add the router as shown in the image to the right.
Then add the DNS server as shown in the image to the right.
Hyper V Machine install
Click the start menu then type and open Hyper-V. Click on your machine's hostname to see the management panel.
Downloading and Installing Ubuntu within Hyper-V
We are going to install a Linux VM within this Windows Server instance. Browse to https://mirror.aarnet.edu.au/pub/ubuntu/releases/ and download a recent Ubuntu ISO as your install media. Note that you will probably need to add exceptions as you use IE on Windows Server. It is pretty paranoid about where you use a web browser.
Once downloaded, return to Hyper-V manager, and Click New->Virtual Machine under actions on the right. Follow the defaults, assign 2048 MB memory. Under networking, select the create the virtual switch that you created. It should be called NATSwitch. Create a virtual hard disk of 10 GB.
Under Installation Options, choose to Install an operating system from a bootable CD/DVD drive then browse for and choose a .iso file. Windows will have downloaded to the Downloads directory.
At this point, you should have been returned to Hyper-V manager. Double click on your ubuntu Virtual Machine to start the installation process via the media you just provided. Then finish and install the Ubuntu operating system. Follow the prompts and login.
Once you have installed Linux, test the network connection.
Make sure you Terminate the Image at the end
The Windows image that you have launched could be very costly if left on so do make sure that you have terminated it at the end of the lab. Make sure that you double-check that both the virtual machine and the volume/disk have been removed.
