Difference between revisions of "Obtaining a Linux Environment"
| Line 156: | Line 156: | ||
==== Windows ==== | ==== Windows ==== | ||
| − | |||
| − | |||
Go here: https://www.microsoft.com/en-us/p/ubuntu/9nblggh4msv6?activetab=pivot:overviewtab and "Get" Ubuntu from the Microsoft store. | Go here: https://www.microsoft.com/en-us/p/ubuntu/9nblggh4msv6?activetab=pivot:overviewtab and "Get" Ubuntu from the Microsoft store. | ||
| − | |||
| − | |||
After this, you should go to the windows start bar and type ubuntu and try to open Ubuntu. | After this, you should go to the windows start bar and type ubuntu and try to open Ubuntu. | ||
| Line 185: | Line 181: | ||
Image:windows_wsl_running.png|''[[commons:Windows running Ubuntu| Windows running Ubuntu]]'' (Windows running Ubuntu) | Image:windows_wsl_running.png|''[[commons:Windows running Ubuntu| Windows running Ubuntu]]'' (Windows running Ubuntu) | ||
</gallery> | </gallery> | ||
| − | |||
| − | |||
| − | |||
| − | |||
Revision as of 04:28, 11 May 2021


This lab is designed to get you up and running in a Linux environment as quickly as possible. In this week the goal is to get the Linux environment on your Windows or OSX operating system running on the computer sitting in front of you. Internal South St students are encouraged to do this in the labs, and then go home and re-do the task on their own computer. External students, as well as Singapore and Dubai based students, will complete this on their own computer in class.
Contents
Virtualization
Virtual box offers a virtualized environment to run an operating system. The images to the right show Ubuntu Linux running in a Windows environment. Below that you can see Windows running in a Linux environment. We can virtualize any operating system within another and this is a very powerful tool that should become clearer as we progress through the unit. VirtualBox is just one of many approaches to doing this. If you are interested in trying something different outside of class time, feel free to have a read and try to understand the difference between:
- Hyper-V for Windows
- Virtual Box
- VMware
- Parallels for MAC
You can download VirtualBox at the link below, but if you are in the South St labs, running windows, this will already be done:
Note that if you are in the South St labs, you should speak with your tutor about how to access the Internet for your operating system.
If you are working on your own computer, and you already have a Virtualisation tool such as VMware or Parallels, feel free to use that but understand that you will need to translate the Virtual box instructions below to your own software. Also if you have completed this exercise in the labs and would like to try something else on your home PC, feel free to do this. Experimenting is a great way to learn.
After you have installed Virtual box, you should download the Ubuntu Linux image. Although pre-installed Ubuntu Virtualbox images exist, and this would be the most expedient approach, we will download a .iso file. These types of files are used to install an operating system from scratch and were historically burned onto a cd. Download from a local mirror:
We will now use the .iso image file, that you Download below in Virtual box.
ICT171
Get the desktop image within:
- Perth: https://mirror.aarnet.edu.au/pub/ubuntu/releases/20.04/
- Singapore or Dubai http://download.nus.edu.sg/mirror/ubuntu-releases/20.04/
ICT109/ICT516
Get the Server image within:
- Perth: https://mirror.aarnet.edu.au/pub/ubuntu/releases/20.04/
- Singapore or Dubai http://download.nus.edu.sg/mirror/ubuntu-releases/20.04/
ICT369
Try something new. I have been enjoying Parrot Linux and Arch Linux, but do your research and pick something that resonates with you.
- Lubuntu Linux: http://mirror.internode.on.net/pub/ubuntu/lubuntu/20.04/
- Parrot Linux https://parrotsec.org/download/
- Arch Linux: https://download.nus.edu.sg/mirror/archlinux/iso/ - Better bring your A game as this is not for the faint of heart
If you are relatively new to Linux then it would be safer to start with Ubuntu. Get the Server image within:
- Perth: https://mirror.aarnet.edu.au/pub/ubuntu/releases/20.04/
- Singapore or Dubai http://download.nus.edu.sg/mirror/ubuntu-releases/20.04/
Still unsure
Consult with your tutor about which image to download.
Start Virtualbox
Follow the instructions in the captions under the images below.


Note that what we are doing here is mapping the iso as a virtual cd drive. After doing this, the Ubuntu machine should start booting. Eventually, you should be able to click Install Ubuntu.
Work through the installation of your Ubuntu Linux install
Yes, we are throwing you in at the deep end here! If you get stuck please make use of the forums, your tutor and your peers. That's what they are there for! Working through the problems and seeking assistance will get you there. Along the way, you'll be learning applied skills and a problem-solving approach that is essential for all IT professionals.
When your machine has finished installing you may need to manually reboot it. Go to Machine->Reset
Next week you will start to learn the Linux command line and get a bit more proficient in operating it. Internal students who have only completed this in the labs are encouraged to have a go on their home machine. Don't leave your lab yet, however.
Read and learn about different Linux Distros
Spend some time reading about what we mean by the word distro. Read and think about the different Linux distros and their use. Feel free to have a read here: https://www.howtogeek.com/191207/10-of-the-most-popular-linux-distributions-compared/
Consider whether you would like to try something different at home. If you have time in the labs, this is the perfect time to try downloading a different distro and playing with it in Virtualbox.
Some of your local mirrors will distribute many different Linux Operating Systems.
- Perth: https://mirror.aarnet.edu.au/pub/
- Singapore or Dubai http://download.nus.edu.sg/mirror/
Click only if you are a Sheldon, Big Bang Theory, fan https://www.youtube.com/watch?v=X_mzgdQGwY4
Have some fun
Try to have some fun and spend some time doing something you find interesting in Linux. Below somebody is offering a command-line based video of Star Wars. The more you can just spend some time in Linux, the more you will pick up. The following will only work if you have an Internet connection. Can you open a terminal and run the following command?
telnet towel.blinkenlights.nl
External and Dubai/Singapore Students
In future weeks labs might refer to getting your lab partner to test or try to do something on your Linux machine. For you, you will be your partner. In all these cases, where we might say "get your lab partner to test your webpage" OR "get your partner to login via ssh into your Linux machine, you will need to do this from your native operating system (most likely this is Windows or MacOS).
To perform these tasks, we want your Linux Virtual machine's network interface to be accessible from your Windows or MacOS machine. Set the network adapter to bridged and select your network adapter which connects to the Internet. Please seek assistance from your tutor with this.

Troubleshooting at home
If you experience errors stating that "VT-x" is not available, you may need to turn on virtualisation in your bios. Every computer manufacturer has a different method to access the bios; you may need to google “HP how to turn on virtualisation bios” or “dell how to turn on virtualisation bios”.
For Apple or OSX this should already be enabled. Note that if you have very new MAC, with an M1 processor then you may need to chat with your tutor and unit coordinator. The new apples do not use x86_64 chips and thus the way to do virtualisation is currently a moving target.
If you get stuck on this step or do not feel confident, then ask your tutor. Also, do lots of reading until you are confident that you know what you are doing. See the links below:
- https://forums.virtualbox.org/viewtopic.php?f=6&t=87752
- https://2nwiki.2n.cz/pages/viewpage.action?pageId=75202968
Extra
If you would like your guest VM to be able to resize the screen you may want to try installing the following extensions you will need to execute these in a terminal session.
sudo apt install virtualbox-guest-dkms virtualbox-guest-utils
If your virtual machine also has a GUI you should also do the following command. Do not use the following command if you are using a cli only machine.
sudo apt install virtualbox-guest-x11
You will need to reboot after you do this. If you are using VMware, then these steps tend to happen automatically.
Free time
Remember that VirtualBox is just one of many approaches to doing this. If you are interested in trying something different outside of class time, feel free to have a read and try to understand the difference between:
- Hyper-V for Windows
- Virtual Box
- VMware
- Parallels for MAC
If you don't like VMware, feel free to research about and try one of the others. In this unit, we want to teach you ways of working with servers, but ultimately leave the tool choice up to you. This is why when we come to Cloud Computing, you will use both Amazon EC2 as well as Microsoft Azure.
If you find yourself with more free time and you feel like you are pretty advanced, then please work through Linux MOTD for your system.

If you can't get the lab to work but still need a Linux Environment
If you cannot get a virtual machine to run in Linux today then these are your options. Pick based on the operating system that you are using:
Mac
Click on the search tool in your mac and search for the terminal. It will look like:
Windows
Go here: https://www.microsoft.com/en-us/p/ubuntu/9nblggh4msv6?activetab=pivot:overviewtab and "Get" Ubuntu from the Microsoft store.
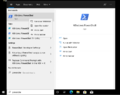
After this, you should go to the windows start bar and type ubuntu and try to open Ubuntu.
If you get an error like:
"The WSL Optional Component is not Enabled. Please Enable it and Try again"
Then you need to follow the following steps to install WSL
- Click on the Windows start bar and type "Powershell".
- Right click on the powershell icon and "Run as Administrator"
- Type the following in the powershell window:
Enable-WindowsOptionalFeature -Online -FeatureName Microsoft-Windows-Subsystem-Linux
Now you should be able to go back and click on the start bar and open Ubuntu
When you are successful, you will be asked to create a user account, which will look like:
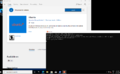
Get and Launch Ubuntu (Get and Launch Ubuntu)
Run Powershell as Admin (Run Powershell as Admin)
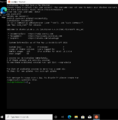
Windows running Ubuntu (Windows running Ubuntu)


