Difference between revisions of "Windows Server in EC2 Intro"
| (11 intermediate revisions by the same user not shown) | |||
| Line 1: | Line 1: | ||
| − | Launch a Windows 2019 Base Server in the cloud. As Windows Server runs a GUI by default, it generally requires more resources than Linux. To make my experience a little more snappy, I chose a moderate instance and was happy to accept the small additional cost for this convenience. Choose as you see fit. You should also open ports for RDP, HTTP | + | Launch a Windows 2019 Base Server in the cloud. As Windows Server runs a GUI by default, it generally requires more resources than Linux. To make my experience a little more snappy, I chose a moderate instance and was happy to accept the small additional cost for this convenience. Choose as you see fit. You should also open ports for RDP, HTTP and HTTPS. |
| − | == Connecting to Windows Server | + | == Connecting to Windows Server == |
| − | Go to https://console.aws.amazon.com then EC2 and launch your Windows server instance, I chose the "Microsoft Windows Server 2019 Base" Amazon Machine Image that was Free Tier Eligible. As you create the instance make sure that, in addition to the RDP port, you also open HTTP and | + | Go to https://console.aws.amazon.com then EC2 and launch your Windows server instance, I chose the "Microsoft Windows Server 2019 Base" Amazon Machine Image that was Free Tier Eligible. As you create the instance make sure that, in addition to the RDP port, you also open HTTP and HTTPS. After you have made these firewall modifications, you can create the instance. After you have created this instance then right-click on the instance and click ''Connect''. |
| − | |||
| − | |||
You can connect to your Windows server using any operating system. | You can connect to your Windows server using any operating system. | ||
| Line 149: | Line 147: | ||
Then hit enter. To add a user you will need to click on Users, then on the right, under Users, click on ''More Actions->Add User''. Independently add Alice, Bob and Mallory giving each user a strong password that you will remember. | Then hit enter. To add a user you will need to click on Users, then on the right, under Users, click on ''More Actions->Add User''. Independently add Alice, Bob and Mallory giving each user a strong password that you will remember. | ||
| − | == Running | + | == DNS & Certificates Revisited == |
| + | |||
| + | At this point we will revisit DNS. Go to wherever you manage your domain name and add an additional A record. Don't edit any previous links that might link to current working assignments, instead, I would like you to add an A record with a subdomain. You can choose what you want the subdomain to be. Frequently we see them as blog.somedomain.com. You could use: | ||
| + | |||
| + | windows.yourdomain.link | ||
| + | |||
| + | This would be linked to the public IP address of your windows machine. Once this is working, lets see if we can use the application here: | ||
| + | [[File:Add_site_in_IIS_manager.png|right|thumb|x300px|alt=Add a site in IIS Manager|Add a site in IIS Manager]] | ||
| + | https://www.win-acme.com/ | ||
| + | |||
| + | If you get lots of annoying errors when browsing using windows server, you can override theme here: https://medium.com/tensult/disable-internet-explorer-enhanced-security-configuration-in-windows-server-2019-a9cf5528be65 | ||
| + | |||
| + | So once you have visited https://www.win-acme.com/ and downloaded and extracted the files. You should add a new site in the IIS Manager. Make sure you share the C:\inetpub\wwwroot and in the hostname section add windows.yourdomain.link | ||
| + | |||
| + | Once you have done this then run wacs.exe and sign up for a certificate. Remember that DNS would need to be working before you can get a certificate. You would also need HTTP, HTTPS and RDP ports to be open on your windows server. Once this is done you should be able to visit you domain name and connect with the lock in the URL bar. | ||
| + | |||
| + | == Running Linux on Windows== | ||
| + | |||
| + | [[File:Linux_on_Windows.png|right|thumb|x350px|alt=Bash on Windows|Bash on Windows]] | ||
| + | |||
| + | In addition to releasing Powershell as open source, Microsoft are allowing the Linux Bash environment to operate on Windows. This means that existing bash scripts should run on Windows with minimal modifications. | ||
| + | |||
| + | Open the powershell ise and run: | ||
| + | |||
| + | Enable-WindowsOptionalFeature -Online -FeatureName Microsoft-Windows-Subsystem-Linux | ||
| + | |||
| + | After running this you will need to restart. | ||
| − | + | After your machine has restarted and you have re-connected. Open powershell ISE and get your distro using curl | |
| − | + | curl.exe -L -o ubuntu-1804.appx https://aka.ms/wsl-ubuntu-1804 | |
| − | + | You can then install it with: | |
| − | + | Add-AppxPackage .\ubuntu-1804.appx | |
| − | + | After this, go to the start menu and search for ubuntu. Click on it to complete the installation. You will be asked to create a user. | |
| − | + | Reflect on what you have just done. How is installing the ubuntu environment different from a virtual machine? Why would a corporation like Microsoft embrace what has historically been a competitor? | |
| − | + | If you have some spare time, it would be worth reading about this to try to understand the reasons. This shift has been occurring for a few years now. | |
| − | + | *https://arstechnica.com/gadgets/2020/05/microsofts-romance-with-open-source-software-on-display-at-build-2020/ | |
| + | *https://www.phoronix.com/scan.php?page=news_item&px=Microsoft-2018-Surprises | ||
| − | + | === Troubleshooting installing the Linux Subsystem === | |
| − | |||
| − | |||
| − | |||
| − | |||
| − | + | If you have problems installing the Linux subsystem, please check out the alternative instructions here: https://csn.murdoch.edu.au/mediawiki/index.php/Obtaining_a_Linux_Environment#Windows | |
| − | + | [[File:my_billing_dashboard.png|right|thumb|x300px|alt=My Billing Dashboard| My Billing Dashboard]] | |
| − | + | == Budgets and Costs - Super Important! == | |
| − | |||
| − | |||
| − | + | If you won't be using your instance anymore, you may wish to shut it down or terminate (delete) it to decrease the chances of inadvertently running multiple instances and incurring EC2 usage charges. It is easy to launch instances in different countries and not notice them running. Remember that cloud-based services are often billed on the run-time of your server. Be particularly careful if you launch an expensive instance featuring large memory, fast CPUs or GPU processors. | |
| − | + | At the most simple level, you want to ''click on your name in EC2 and go to My Billing Dashboard''. See the image to the right. You should be able to reconcile the costs that you see here. | |
| − | + | You will also want to set a budget, with an alert as well. Make sure that you follow the slideshow below, to set an actual budget and an alert. To get started ''click on your name in EC2 and go to My Billing Dashboard'' then look for the AWS budgets link, as indicated in the first image in the slideshow below. Then follow the text description below the slideshow to setup a budget with alerts. | |
| − | ''( | + | <gallery mode="slideshow"> |
| + | Image:Click_on_AWS_Budgets.png| ''[[Image:Click on AWS Budgets| Click on AWS Budgets]]'' (Click on AWS budgets) | ||
| + | Image:click_on_create_budget.png|''[[Image:click on create_budget| Click on create budget]]'' (Click on Create Budget) | ||
| + | Image:Choose_cost_budget.png|''[[Image:choose_cost_budget| Choose cost_budget]]'' (Choose cost budget) | ||
| + | Image:Set_a_budget.png|''[[Image:set_a_budget| set a budget]]'' (Set a budget) | ||
| + | Image:Set_an_alert_threshold.png|''[[Image:set_an_alert_threshold| set an alert threshold]]'' (Set an alert threshold) | ||
| + | Image:Click_and_create_the_budget.png|''[[Image:click and create the budget| click_and_create_the_budget]]'' (Click and create the budget) | ||
| + | </gallery> | ||
Latest revision as of 07:48, 10 May 2022
Launch a Windows 2019 Base Server in the cloud. As Windows Server runs a GUI by default, it generally requires more resources than Linux. To make my experience a little more snappy, I chose a moderate instance and was happy to accept the small additional cost for this convenience. Choose as you see fit. You should also open ports for RDP, HTTP and HTTPS.
Contents
Connecting to Windows Server
Go to https://console.aws.amazon.com then EC2 and launch your Windows server instance, I chose the "Microsoft Windows Server 2019 Base" Amazon Machine Image that was Free Tier Eligible. As you create the instance make sure that, in addition to the RDP port, you also open HTTP and HTTPS. After you have made these firewall modifications, you can create the instance. After you have created this instance then right-click on the instance and click Connect.
You can connect to your Windows server using any operating system.
- In Windows you can use Remote Desktop Connection, which is included with the Operating System.
- In Ubuntu you can use Remmina Remote Desktop Client which is also included by default.
- In OSX you can download Microsoft Remote Desktop (https://itunes.apple.com/au/app/microsoft-remote-desktop/id715768417?mt=12)
You should experiment with the colour and resolution settings in the client connection to find something that works for your Internet Connection. If you have a fast Internet connection then you can choose higher quality settings.
Familiarity with the GUI
This lab should further your skills in Windows, and Powershell server scripts. By the end of this lab, you should note that Microsoft Powershell and Linux Bash are powerful and useful server scripting languages. There is no need to debate which is better as they are both now multi-platform and you can now use the scripting language of your choice in Windows or Linux.
Familiarise yourself with the server environment using the GUI:
- What CPU is your machine running? (Is it a server or desktop-class processor?)
- How much memory and disk space do you have?
- Open a web browser and type where am i in the URL bar. Note that Windows Server can have a strict security policy. You may need to manually permit access to each website. You should see the location of the data centre displayed in the output.
Windows CLI Basics
Click on the start menu and search for "Windows Powershell" and open it. Be sure to open the ISE version of Powershell, as this is the integrated environment that provides both an editor where you can write scripts and a command-line from which you can execute them.
Type the following commands and answer the questions. Hint: Regardless of the CLI environment that I am working in (Linux, Cisco, Windows), I tend to use the tab key to auto complete my commands. Make sure you give it a try.
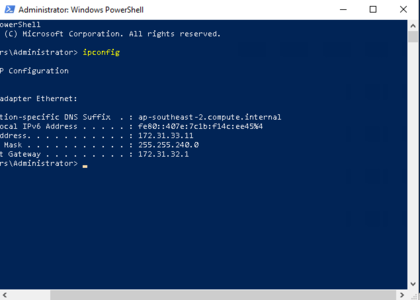
What is your IPv4 IP address? Try:
ipconfig
What ports are open? Try:
netstat -an
Identify the RDP session to your windows server. What is the Global IP address of the machine you are RDP'ing from?
whoami
This command is the same as Linux but will return domain\username. If your computer isn't connected to a domain this command will return computer name\username.
dir
Try the linux equivalent
ls
This will create an empty file.
notepad emptyfile.txt
This will open a text file for editing. Add some text then save and exit. Retype:
dir
You should note emptyfile.txt. It should be greater than 0 bytes. Copy the file into Downloads.
copy emptyfile.txt Downloads\
Then go and check that the file has moved to the desired location.
cd Downloads
Remove the original file created.
cd ..
del emptyfile.txt
This time we are going to move the file back to the original location. Note that with the commands that we are going to use absolute paths:
You will need to adjust the path to reflect your username and home directory.
(see "whoami")
Similar to Linux, use the tab key to autocomplete while you type.
move C:\Users\<Username>\Downloads\emptyfile.txt C:\Users\<Username>\
Starting and Ending Processes
List the programs that are running on your Windows system:
tasklist
What is this command and what is the equivalent in Linux? Start Notepad from the command line:
notepad
Re-run:
tasklist
Find the Notepad process. Kill this process from the command line. You can do this with the name or the Process ID (PID). The /f is for "force"
taskkill /f /im myprocess.exe
OR
taskkill /f /pid 1234
Running a Webserver on Windows (IIS)
Similar to Linux, Windows also provides a range of different services that Enterprise and Internet Servers would want to run. Most of the services that you would want to run are provided by windows and can simply be activated. To see the list of available services, click on Windows Start bar and type
Server Manager
Hit enter to open Server Manager then click
Add roles and features
Then hit next to accept the defaults until you hit Server Roles. Under Server Roles, you want to enable Web Server (IIS). Hit next to enable this feature and install the Windows Web Server.
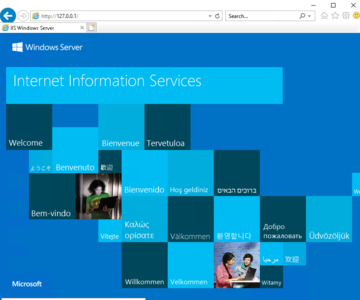
Test the installation locally. From your Windows Server machine Open your web browser, Internet Explorer, and browse to:
127.0.0.1
Hopefully, you will see the windows IIS default page. If you don't see the default page, ask your tutor and troubleshoot. You may find you need to prefix the address with http://127.0.0.1 as some Microsoft browsers will assume you are searching for information rather than visiting a site.
Test from the physical machine sitting in front of you. Go to Amazon EC2 and record the public IP address of your windows server machine.
Then, paste that IP address into your web browser and test the operation of your web browser.
You should see something that looks like the image to the right:
On Linux, we can edit the index.html page in /var/www/index.html. In Windows, this file is stored at c:/inetpub/wwwroot/iisstart.htm
Edit this file with
notepad c:\inetpub\wwwroot\iisstart.htm
After you have done this, refresh your web page to see the changes that you have made. Note that this may work when you visit 127.0.0.1 from your windows server, but why is the same page not available via the global IP address from other devices. What do you need to do to make this windows web server available to the world?
Adding Users
On Windows server, you are currently the Administrator. Let's add three users, Alice, Bob and Mallory.
Click on the start menu and type:
add user
Then hit enter. To add a user you will need to click on Users, then on the right, under Users, click on More Actions->Add User. Independently add Alice, Bob and Mallory giving each user a strong password that you will remember.
DNS & Certificates Revisited
At this point we will revisit DNS. Go to wherever you manage your domain name and add an additional A record. Don't edit any previous links that might link to current working assignments, instead, I would like you to add an A record with a subdomain. You can choose what you want the subdomain to be. Frequently we see them as blog.somedomain.com. You could use:
windows.yourdomain.link
This would be linked to the public IP address of your windows machine. Once this is working, lets see if we can use the application here:
https://www.win-acme.com/
If you get lots of annoying errors when browsing using windows server, you can override theme here: https://medium.com/tensult/disable-internet-explorer-enhanced-security-configuration-in-windows-server-2019-a9cf5528be65
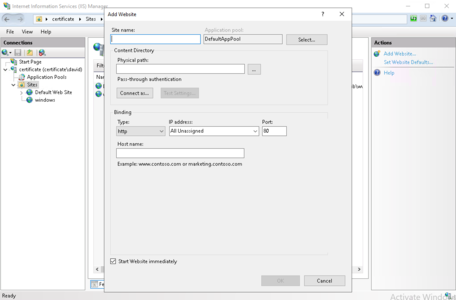
So once you have visited https://www.win-acme.com/ and downloaded and extracted the files. You should add a new site in the IIS Manager. Make sure you share the C:\inetpub\wwwroot and in the hostname section add windows.yourdomain.link
Once you have done this then run wacs.exe and sign up for a certificate. Remember that DNS would need to be working before you can get a certificate. You would also need HTTP, HTTPS and RDP ports to be open on your windows server. Once this is done you should be able to visit you domain name and connect with the lock in the URL bar.
Running Linux on Windows
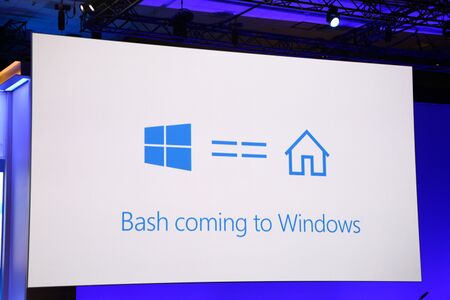
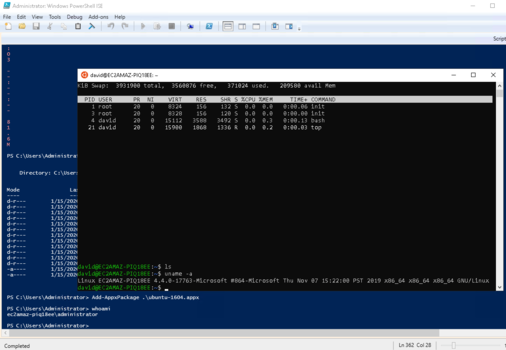
In addition to releasing Powershell as open source, Microsoft are allowing the Linux Bash environment to operate on Windows. This means that existing bash scripts should run on Windows with minimal modifications.
Open the powershell ise and run:
Enable-WindowsOptionalFeature -Online -FeatureName Microsoft-Windows-Subsystem-Linux
After running this you will need to restart.
After your machine has restarted and you have re-connected. Open powershell ISE and get your distro using curl
curl.exe -L -o ubuntu-1804.appx https://aka.ms/wsl-ubuntu-1804
You can then install it with:
Add-AppxPackage .\ubuntu-1804.appx
After this, go to the start menu and search for ubuntu. Click on it to complete the installation. You will be asked to create a user.
Reflect on what you have just done. How is installing the ubuntu environment different from a virtual machine? Why would a corporation like Microsoft embrace what has historically been a competitor?
If you have some spare time, it would be worth reading about this to try to understand the reasons. This shift has been occurring for a few years now.
- https://arstechnica.com/gadgets/2020/05/microsofts-romance-with-open-source-software-on-display-at-build-2020/
- https://www.phoronix.com/scan.php?page=news_item&px=Microsoft-2018-Surprises
Troubleshooting installing the Linux Subsystem
If you have problems installing the Linux subsystem, please check out the alternative instructions here: https://csn.murdoch.edu.au/mediawiki/index.php/Obtaining_a_Linux_Environment#Windows
Budgets and Costs - Super Important!
If you won't be using your instance anymore, you may wish to shut it down or terminate (delete) it to decrease the chances of inadvertently running multiple instances and incurring EC2 usage charges. It is easy to launch instances in different countries and not notice them running. Remember that cloud-based services are often billed on the run-time of your server. Be particularly careful if you launch an expensive instance featuring large memory, fast CPUs or GPU processors.
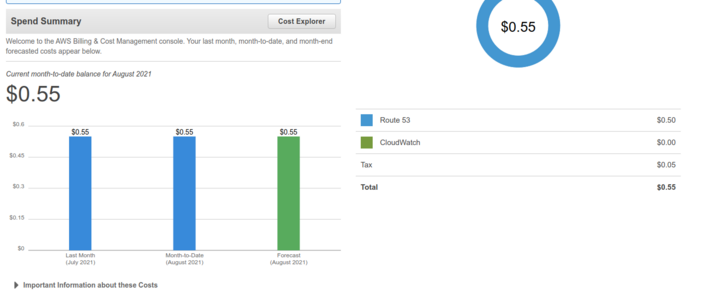
At the most simple level, you want to click on your name in EC2 and go to My Billing Dashboard. See the image to the right. You should be able to reconcile the costs that you see here.
You will also want to set a budget, with an alert as well. Make sure that you follow the slideshow below, to set an actual budget and an alert. To get started click on your name in EC2 and go to My Billing Dashboard then look for the AWS budgets link, as indicated in the first image in the slideshow below. Then follow the text description below the slideshow to setup a budget with alerts.
