Difference between revisions of "RTS/CTS and Network Analysis using Wireshark"
| (10 intermediate revisions by the same user not shown) | |||
| Line 1: | Line 1: | ||
| − | The purpose of this lab is to investigate RTS/CTS and CTS-to-self messaging in the Wild. By doing this we will also learn about monitor mode and what it does, as well as gaining some familiarity with Wireshark. | + | The purpose of this lab is to investigate RTS/CTS and CTS-to-self messaging in the Wild. By doing this we will also learn about monitor mode and what it does, as well as gaining some familiarity with Wireshark. In addition, we will also be solidifying the knowledge from the lecture that reviewed frame types and the individual headers. It is not useful or even necessary to spend time memorising frame types and definitions, but you with a good understanding of WiFi will know what most of the frames are and will understand why they are there. This should come naturally with time and experience. |
| + | |||
| + | In this activity, we are looking for components that we learnt about in the lecture. You should hopefully build some excellent Wireshark skills in this course and be proficient at troubleshooting wireless network connections from Wireshark. Wiresharks troubleshooting skills are important and there are entire certification programs built around Wireshark: https://www.chappell-university.com/ | ||
| + | |||
| + | In this activity, we will be obtaining monitor mode WiFi captures. We will be using the Linux method of obtaining these, but you should be aware that in most large scale, Cisco, Meraki, Aerohive, Ubiquiti et cetera networks, these monitor mode pcaps can be obtained through an unused AP. It is a common method of troubleshooting problems in WiFi netowrks. | ||
| + | |||
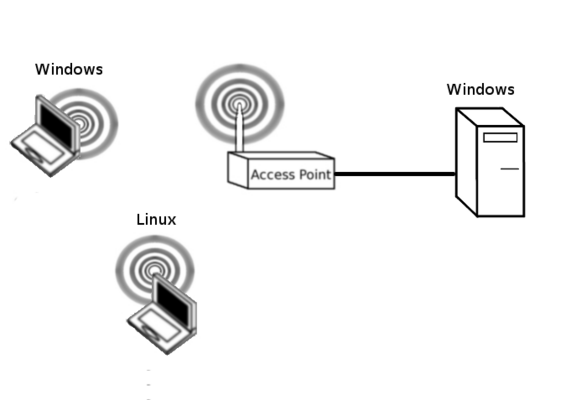
| + | [[File:Basic_setup.png|right|thumb|x400px|alt=Basic lab setup|Basic lab setup]] | ||
== Initial Setup == | == Initial Setup == | ||
| Line 7: | Line 13: | ||
To limit the number of computers required, you may wish to make the Windows Wireless device, in the diagram below, your phone or laptop. | To limit the number of computers required, you may wish to make the Windows Wireless device, in the diagram below, your phone or laptop. | ||
| − | + | Setup a basic WiFi access Point. Nothing complicated required, just establish network connectivity and change the SSID. If you need more instruction then you can review the details in this link, but for this lab, you don't need to to any wiring in the data centre. A Linksys on your desk will work fine: https://csn.murdoch.edu.au/mediawiki/index.php/Broadband_CPE_Scenarios_with_Mikrotik_and_DD-WRT#Setup_the_Linksys.2FDD-WRT_AP_.28SSID.2C_TX_Power.2C_Channels.29 | |
| + | |||
| + | ''For the purposes of this lab, make sure that you set a channel on the 2.4 and the 5GHz band, and set the Wireless mode to B/G Mixed in the 2.4 GHZ band and A-only in the 5GHz band. Without doing these steps you may find it hard to see any data, why?'' | ||
| + | |||
| + | === Computers/lab specific setup === | ||
| + | |||
| + | Currently the machines that we use in the labs are Virtual machines that sit within the Standard Operating Environment (SOE) Windows host. For these labs, you should use the Ubuntu OR Windows VM and make sure that your virtual network adaptor is in bridged mode. By being in bridged mode you will be able to obtain an IP address on the 192.168.1.x network and avoid the complications with NAT. You will likely need to make these changes in virtual box and then toggle your network interface, within the VM, down and then up. Remember unless you have an IP address on the 192.168.1.x subnet then you are going to find connectivity in this lab to be difficult. | ||
== Wireshark == | == Wireshark == | ||
| Line 13: | Line 25: | ||
Wireshark is an application that is used for troubleshooting and studying networks. I hope that you will become very familiar with it as it is an excellent learning/diagnostic tool. | Wireshark is an application that is used for troubleshooting and studying networks. I hope that you will become very familiar with it as it is an excellent learning/diagnostic tool. | ||
| − | Under standard operation, wireless devices are only able to see frames that are either sourced by them or destined for them. Open wireshark on either Windows or Linux and start capturing on your wifi adapter. Ping your access point over the link and ensure that you have captured these frames. Save your packet capture as we will return to this later. What can you see? What is do you think might be missing? | + | Under standard operation, wireless devices are only able to see frames that are either sourced by them or destined for them. Open wireshark on either Windows or Linux and start capturing on your wifi adapter. Ping your access point over the link and ensure that you have captured these frames. Save your packet capture, as normal_sta_mode.pcap and we will return to this later. For now spend 5 minutes looking through the capture. What can you see? What is do you think might be missing? |
Note that we are unable to see important management frames like beacons, probe requests and probe responses. To use monitor mode we need a Linux OS and to put a wireless adaptor in a special mode called monitor mode. | Note that we are unable to see important management frames like beacons, probe requests and probe responses. To use monitor mode we need a Linux OS and to put a wireless adaptor in a special mode called monitor mode. | ||
| Line 23: | Line 35: | ||
sudo iwconfig [adaptor_name] channel [Channel your AP is using] | sudo iwconfig [adaptor_name] channel [Channel your AP is using] | ||
| − | + | Open wireshark from within your VM with: | |
| − | + | sudo wireshark | |
| + | You should be able to capture traffic in monitor mode on your wireless interface. What is different in the monitor mode output? What do you think that monitor mode does? Compare the previous output that you saved earlier. Discuss with your group and chat with your tutor. | ||
| − | + | == Lets talk about frames == | |
There are 3 different types of WiFi Frames | There are 3 different types of WiFi Frames | ||
| Line 36: | Line 49: | ||
*Data Frames | *Data Frames | ||
| − | + | In your monitor mode capture, find one of each of the following: | |
*Beacon frame | *Beacon frame | ||
| Line 46: | Line 59: | ||
*Block ACK frames | *Block ACK frames | ||
| − | Write down a one | + | For each of the above frame types: |
| + | |||
| + | *Classify them into Management, Control or Data frames - Note that wireshark will tell you if you spend the time to dig through the capture. | ||
| + | *Write down a one sentence description for each of these frames | ||
== RTS/CTS Messaging == | == RTS/CTS Messaging == | ||
| Line 102: | Line 118: | ||
*What percentage of data frames are retransmitted? | *What percentage of data frames are retransmitted? | ||
*Why do you think packets are being lost? | *Why do you think packets are being lost? | ||
| + | |||
| + | == Final activity == | ||
| + | |||
| + | Once you have got comfortable with looking at large network packet captures in Wirshark, we will show you how you can search these captures using more traditional methods. In Wireshark, click File->Export Packet Disections->As Plain Text. Export the file as monitor_mode.txt and make sure you click the box to export the bytes. | ||
| + | |||
| + | Now you can start searching the file with more traditional tools. Try the following | ||
| + | |||
| + | cat monitor_mode.txt | grep Probe | ||
| + | cat monitor_mode.txt | grep Your_SSID | ||
| + | cat monitor_mode.txt | grep Apple | ||
| + | |||
| + | Finally, you may notice that some people's phones will leak the SSID's of APs that they have connected to in the probe request. You can filter probe requests with: | ||
| + | |||
| + | cat monitor_mode.txt | grep "Probe Request" | ||
| + | |||
| + | Is there one that frequently comes up? Eduroam, Starbucks, McDonalds. | ||
== Restore Factory Defaults == | == Restore Factory Defaults == | ||
At the end of every lab you should restore factory defaults to remove the previous group's settings. To do this, Administration->Factory Defaults->Yes, apply, ok. | At the end of every lab you should restore factory defaults to remove the previous group's settings. To do this, Administration->Factory Defaults->Yes, apply, ok. | ||
Latest revision as of 08:36, 14 August 2023
The purpose of this lab is to investigate RTS/CTS and CTS-to-self messaging in the Wild. By doing this we will also learn about monitor mode and what it does, as well as gaining some familiarity with Wireshark. In addition, we will also be solidifying the knowledge from the lecture that reviewed frame types and the individual headers. It is not useful or even necessary to spend time memorising frame types and definitions, but you with a good understanding of WiFi will know what most of the frames are and will understand why they are there. This should come naturally with time and experience.
In this activity, we are looking for components that we learnt about in the lecture. You should hopefully build some excellent Wireshark skills in this course and be proficient at troubleshooting wireless network connections from Wireshark. Wiresharks troubleshooting skills are important and there are entire certification programs built around Wireshark: https://www.chappell-university.com/
In this activity, we will be obtaining monitor mode WiFi captures. We will be using the Linux method of obtaining these, but you should be aware that in most large scale, Cisco, Meraki, Aerohive, Ubiquiti et cetera networks, these monitor mode pcaps can be obtained through an unused AP. It is a common method of troubleshooting problems in WiFi netowrks.
Contents
Initial Setup
You should start by setting up a network as shown below. Remember that at the beginning of every lab you should restore factory defaults to remove the previous group's settings. To do this, Administration->Factory Defaults->Yes, apply, ok.
To limit the number of computers required, you may wish to make the Windows Wireless device, in the diagram below, your phone or laptop.
Setup a basic WiFi access Point. Nothing complicated required, just establish network connectivity and change the SSID. If you need more instruction then you can review the details in this link, but for this lab, you don't need to to any wiring in the data centre. A Linksys on your desk will work fine: https://csn.murdoch.edu.au/mediawiki/index.php/Broadband_CPE_Scenarios_with_Mikrotik_and_DD-WRT#Setup_the_Linksys.2FDD-WRT_AP_.28SSID.2C_TX_Power.2C_Channels.29
For the purposes of this lab, make sure that you set a channel on the 2.4 and the 5GHz band, and set the Wireless mode to B/G Mixed in the 2.4 GHZ band and A-only in the 5GHz band. Without doing these steps you may find it hard to see any data, why?
Computers/lab specific setup
Currently the machines that we use in the labs are Virtual machines that sit within the Standard Operating Environment (SOE) Windows host. For these labs, you should use the Ubuntu OR Windows VM and make sure that your virtual network adaptor is in bridged mode. By being in bridged mode you will be able to obtain an IP address on the 192.168.1.x network and avoid the complications with NAT. You will likely need to make these changes in virtual box and then toggle your network interface, within the VM, down and then up. Remember unless you have an IP address on the 192.168.1.x subnet then you are going to find connectivity in this lab to be difficult.
Wireshark
Wireshark is an application that is used for troubleshooting and studying networks. I hope that you will become very familiar with it as it is an excellent learning/diagnostic tool.
Under standard operation, wireless devices are only able to see frames that are either sourced by them or destined for them. Open wireshark on either Windows or Linux and start capturing on your wifi adapter. Ping your access point over the link and ensure that you have captured these frames. Save your packet capture, as normal_sta_mode.pcap and we will return to this later. For now spend 5 minutes looking through the capture. What can you see? What is do you think might be missing?
Note that we are unable to see important management frames like beacons, probe requests and probe responses. To use monitor mode we need a Linux OS and to put a wireless adaptor in a special mode called monitor mode.
Monitor Mode on Linux
Follow the instructions here to put the Alpha USB Wifi adapter in monitor mode: Alpha_USB_in_monitor_mode
sudo iwconfig [adaptor_name] channel [Channel your AP is using]
Open wireshark from within your VM with:
sudo wireshark
You should be able to capture traffic in monitor mode on your wireless interface. What is different in the monitor mode output? What do you think that monitor mode does? Compare the previous output that you saved earlier. Discuss with your group and chat with your tutor.
Lets talk about frames
There are 3 different types of WiFi Frames
- Management Frames
- Control Frames
- Data Frames
In your monitor mode capture, find one of each of the following:
- Beacon frame
- Association frame
- Authentication frames
- Data frame
- QoS Data frame
- Acknowledgement (ACK) frames
- Block ACK frames
For each of the above frame types:
- Classify them into Management, Control or Data frames - Note that wireshark will tell you if you spend the time to dig through the capture.
- Write down a one sentence description for each of these frames
RTS/CTS Messaging
Turn on RTS/CTS messaging:
- On your AP, this is under Wireless->Basic-Settings->Advanced-Settings. You should set the threshold to 1.
- On a Windows device: Device Manager->Wireless NIC->Mixed Mode Protection
- On a Linux device:
sudo iwconfig [wireless_adapter_name] RTS 100
Start some continual pings from your wired to your wireless host. Check to see if and RTS/CTS or RTS-to-self messages are being sent. Depending on what channel you use, you will potentially pick up transmissions from many different APs and it may be difficult to find one. Locating the specific data within a large packet capture file is a very important skill for networking professionals. If you are having trouble locating your ICMP ping messages, try disabling the frequency or radio on the 5 GHz band.
Troubleshooting
You may not be able to see all of your frames. Why/Why not? Can you see a higher proportion of BlockAcks, Acks, Beacons or Probe Requests/Response? Why do you think this is?
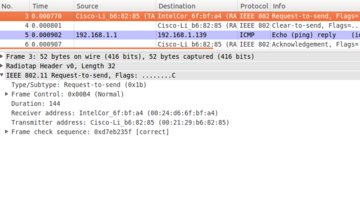
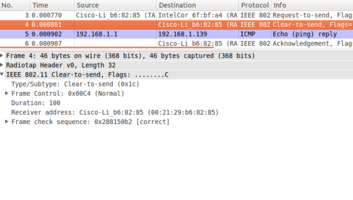
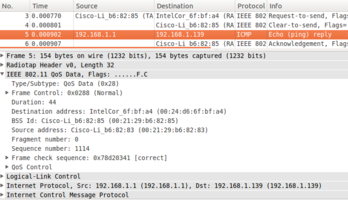
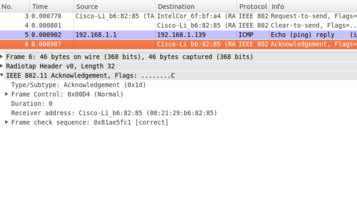
The following diagrams on the right show what you should see when you have identified the appropriate frames:
RTS
CTS
Ping
Ack
Questions
See if you can answer the following questions.
- What is the benefit of the RTS/CTS process? What problem does it solve?
- What is a drawback of the RTS/CTS process?
- Why can't we see the DCF process? Why can't we see interframe spacing?
- What do you think the difference is between an 802.11 ack and a Block Ack. What do you think the block ack bitmap does? Does wired Ethernet use Acks? Why/Why not?
- If you are seeing more acks than data frames, why do you think this is the case?
- Can you see any instances where there is a CTS, without an RTS. What is going on here?
- What is the proportion of Block Acks to Data frames. Why do you think this ratio occurs.
- What percentage of your total frames are data frames
- What data rates are 802.11 acks sent at?
- What is the distribution of packet sizes? Break into:
- < 500 bytes
- < 1000 bytes
- >= 1000 bytes
- Do you believe that your captured distribution is normal? Why, why not?
- What percentage of data frames are retransmitted?
- Why do you think packets are being lost?
Final activity
Once you have got comfortable with looking at large network packet captures in Wirshark, we will show you how you can search these captures using more traditional methods. In Wireshark, click File->Export Packet Disections->As Plain Text. Export the file as monitor_mode.txt and make sure you click the box to export the bytes.
Now you can start searching the file with more traditional tools. Try the following
cat monitor_mode.txt | grep Probe
cat monitor_mode.txt | grep Your_SSID
cat monitor_mode.txt | grep Apple
Finally, you may notice that some people's phones will leak the SSID's of APs that they have connected to in the probe request. You can filter probe requests with:
cat monitor_mode.txt | grep "Probe Request"
Is there one that frequently comes up? Eduroam, Starbucks, McDonalds.
Restore Factory Defaults
At the end of every lab you should restore factory defaults to remove the previous group's settings. To do this, Administration->Factory Defaults->Yes, apply, ok.
