Difference between revisions of "RFID with the Proxmark3"
| (21 intermediate revisions by the same user not shown) | |||
| Line 1: | Line 1: | ||
| − | + | The proxmark is an RFID security tool that is capable of reading from and writing to a range of different RFID cards. Usually RFID readers and writers come from a hardware vendor that only works with a specific frequency and card type. This is much the same as WiFi radios, they are only designed for a narrow frequency set and to talk a single protocol. The proxmark is a swiss army knife of RFID. You could also think of it as a software-defined radio for RFID. Like a lot of security testing tools, it is designed with the expert in mind and does not come with a point and click GUI | |
| − | + | Start by plugging the Proxmark into your computer and connecting it through to your Ubuntu virtual machine. | |
| + | [[File:pm3.png|thumb|600px|right|alt=Introducing the Proxmark3 RDV4|Indroducing the Proxmark3 RDV4]] | ||
| + | |||
| + | <!-- Jimmy was here | ||
| + | |||
| + | '''Please don't plug in your proxmark into your computer until you are instructed to. They are expensive and somewhat easy to brick during the setup phase.''' | ||
== The install == | == The install == | ||
| Line 21: | Line 26: | ||
Install the requirements | Install the requirements | ||
| − | sudo apt-get install --no-install-recommends git ca-certificates build-essential pkg-config libreadline-dev gcc-arm-none-eabi libnewlib-dev qtbase5-dev libbz2-dev libbluetooth-dev libssl-dev | + | sudo apt-get install --no-install-recommends git ca-certificates build-essential pkg-config libreadline-dev gcc-arm-none-eabi libnewlib-dev qtbase5-dev libbz2-dev libbluetooth-dev libssl-dev liblz4-dev |
| Line 36: | Line 41: | ||
sudo make udev | sudo make udev | ||
| − | + | Get permissions to use /dev/ttyACM0 by adding the current user to the proper group to get permission to use /dev/ttyACM0. This step can be done from the RRG/Iceman Proxmark3 repo with | |
| − | + | make accessrights | |
| + | make | ||
| + | |||
| + | '''Reboot Linux now and plug in the Proxmark3''' | ||
| + | |||
| + | [[File:prox_vm_connect.png|thumb|600px|right|alt=When you plug in your proxmark3, you '''Must''' check the following boxes to connect it through to Linux. If you stuff this up, then start again, as you won't have the admin creds on the Windows SOE to release host's (Windows) hold.| When you plug in your proxmark3, you '''Must''' check the following boxes to connect it through to Linux. If you stuff this up, then start again, as you won't have the admin creds on the Windows SOE to release host's (Windows) hold.]] | ||
| − | + | Pull up a fresh terminal, post reboot, then: | |
| − | + | cd proxmark3 | |
| − | + | Then: | |
| − | |||
| − | |||
./pm3-flash-all | ./pm3-flash-all | ||
| − | + | --> | |
| − | + | Perform a: | |
sudo dmesg | grep -i USB | sudo dmesg | grep -i USB | ||
| − | to check that | + | to check that the proxmark looks visible oven USB. Then: |
| + | |||
| + | cd proxmark3 | ||
== Using the Proxmark 3 == | == Using the Proxmark 3 == | ||
| Line 67: | Line 77: | ||
[usb] pm3 --> hw status | [usb] pm3 --> hw status | ||
| + | |||
| + | Who and what is Iceman? Can you find the Github repo? | ||
| + | |||
[usb] pm3 --> hw version | [usb] pm3 --> hw version | ||
| + | |||
| + | What is the embedded processor and instruction set of the Proxmark you have? | ||
| + | |||
[usb] pm3 --> hw tune | [usb] pm3 --> hw tune | ||
| + | |||
| + | What frequency is Low Frequency RFID? What Frequency is High Frequency RFID? | ||
To get an overview of the available commands for LF RFID and HF RFID: | To get an overview of the available commands for LF RFID and HF RFID: | ||
[usb] pm3 --> lf | [usb] pm3 --> lf | ||
| + | |||
| + | How many low frequency tags are supported? | ||
| + | |||
[usb] pm3 --> hf | [usb] pm3 --> hf | ||
| + | |||
| + | How many high frequency tags are supported? | ||
To search quickly for known LF or HF tags: | To search quickly for known LF or HF tags: | ||
| Line 92: | Line 115: | ||
Here you are looking for the card to "couple". So the lower the voltage drops the more the RFID card is drawing from the system and the better the read you will get. | Here you are looking for the card to "couple". So the lower the voltage drops the more the RFID card is drawing from the system and the better the read you will get. | ||
| − | == Start your Skills Test here | + | == Play with the practice RFID cards == |
| + | |||
| + | Take 4 RFID tags/cards from the practice cards for each of them, can you identify: | ||
| + | *Is this a low-frequency or high-frequency tag? | ||
| + | *What type of card is it, and which group might have manufactured it? | ||
| + | |||
| + | = Start your Skills Test here = | ||
At this point, you are ready to start your skills test. Use the materials below as well as your tutor as a guide to complete your skills test as a group. | At this point, you are ready to start your skills test. Use the materials below as well as your tutor as a guide to complete your skills test as a group. | ||
| Line 128: | Line 157: | ||
[[File:mf.png|thumb|400px|right|alt=Generic Mifare commands|Generic Mifare commands]] | [[File:mf.png|thumb|400px|right|alt=Generic Mifare commands|Generic Mifare commands]] | ||
| − | + | Often the proxmark software will prompt you for a command to try. | |
| − | |||
| − | |||
| − | + | hf mfu dump | |
You would then open a separate terminal and: | You would then open a separate terminal and: | ||
| Line 138: | Line 165: | ||
xxd hf-mf-ABCEDFIG-dump.bin | xxd hf-mf-ABCEDFIG-dump.bin | ||
| − | This should provide you with the binary output. | + | This should provide you with the binary output of the card. |
Latest revision as of 01:36, 24 October 2023
The proxmark is an RFID security tool that is capable of reading from and writing to a range of different RFID cards. Usually RFID readers and writers come from a hardware vendor that only works with a specific frequency and card type. This is much the same as WiFi radios, they are only designed for a narrow frequency set and to talk a single protocol. The proxmark is a swiss army knife of RFID. You could also think of it as a software-defined radio for RFID. Like a lot of security testing tools, it is designed with the expert in mind and does not come with a point and click GUI
Start by plugging the Proxmark into your computer and connecting it through to your Ubuntu virtual machine.
Perform a:
sudo dmesg | grep -i USB
to check that the proxmark looks visible oven USB. Then:
cd proxmark3
Contents
Using the Proxmark 3
Then you can start proxmark with
./pm3
Have a play with the following commands:
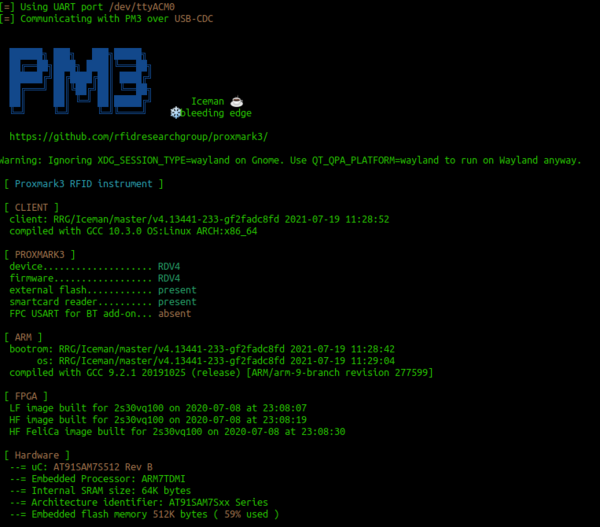
[usb] pm3 --> hw status
Who and what is Iceman? Can you find the Github repo?
[usb] pm3 --> hw version
What is the embedded processor and instruction set of the Proxmark you have?
[usb] pm3 --> hw tune
What frequency is Low Frequency RFID? What Frequency is High Frequency RFID?
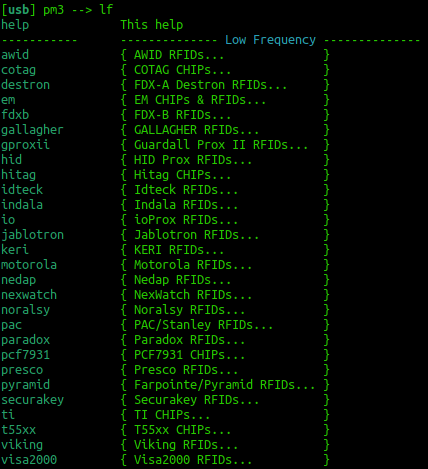
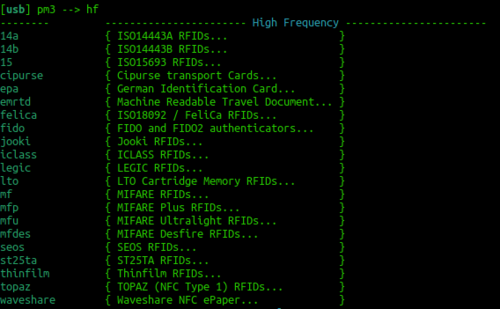
To get an overview of the available commands for LF RFID and HF RFID:
[usb] pm3 --> lf
How many low frequency tags are supported?
[usb] pm3 --> hf
How many high frequency tags are supported?
To search quickly for known LF or HF tags:
[usb] pm3 --> lf search
[usb] pm3 --> hf search
Tune for LF and HF
If you are having trouble getting a read try
lf tune --mix
OR
hf tune --mix
Here you are looking for the card to "couple". So the lower the voltage drops the more the RFID card is drawing from the system and the better the read you will get.
Play with the practice RFID cards
Take 4 RFID tags/cards from the practice cards for each of them, can you identify:
- Is this a low-frequency or high-frequency tag?
- What type of card is it, and which group might have manufactured it?
Start your Skills Test here
At this point, you are ready to start your skills test. Use the materials below as well as your tutor as a guide to complete your skills test as a group.
LF T5577 card
If you think this could be a T55xx you can run a:
lf t55 detect
This should return the type of card. You can then examine the datasheet here: http://ww1.microchip.com/downloads/en/DeviceDoc/ATA5577C-Read-Write-LF-RFID-IDIC-100-to-150-kHz-Data-Sheet-DS70005357B.pdf
You can try to read all of the blocks with the following command:
lf t55xx dump
This should dump all the blocks on the t55xx card
HF Mifare
High Frequency Mifare cards are also super common. You should be able to detect one with the standard:
hf search
If you find a tag record what sort of tag you think it could be. Try just typing:
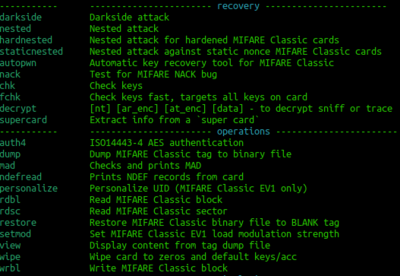
hf
This should reveal all the different types of cards that can be read. Try to correlate the previous info from hf search against the info that you see in the image to the right. You could now try a:
hf mfu info
If that reveals that it is a gen 1a then you could consider executing a command frame the following block:
Often the proxmark software will prompt you for a command to try.
hf mfu dump
You would then open a separate terminal and:
xxd hf-mf-ABCEDFIG-dump.bin
This should provide you with the binary output of the card.


