Difference between revisions of "Raspberry Pi and Basic Electronics"
| Line 17: | Line 17: | ||
== Turning on an LED == | == Turning on an LED == | ||
| − | So in this first activity, I will show you how you can use Python code to turn on an LED in a Raspberry Pi. Start by watching the following video on breadboards: https://www.youtube.com/watch?v=fq6U5Y14oM4 | + | So in this first activity, I will show you how you can use Python code to turn on an LED in a Raspberry Pi. Start by watching the following video on breadboards: https://www.youtube.com/watch?v=fq6U5Y14oM4. First, we will do the wiring: carefully inspect the pinout of the Raspberry Pi below. This is the Pinout for the Raspberry Pi 3. |
| − | |||
| − | |||
[[File:RPI3_Pinout.png|centre|thumb|x400px|alt=A Raspberry Pi 3 Pinout|A Raspberry Pi 3 Pinout]] | [[File:RPI3_Pinout.png|centre|thumb|x400px|alt=A Raspberry Pi 3 Pinout|A Raspberry Pi 3 Pinout]] | ||
| Line 25: | Line 23: | ||
==== Physical wiring ==== | ==== Physical wiring ==== | ||
| − | + | Pick out one of your LEDs. Note that one side is longer than then other. The longer side is positive (red) and the shorter side is negative (black). | |
[[File:LEDposnev.png|center|thumb|x100px|alt=LED Diagram https://learn.sparkfun.com/tutorials/polarity/diode-and-led-polarity|Raspberry Pi Header: https://learn.sparkfun.com/tutorials/polarity/diode-and-led-polarity]] | [[File:LEDposnev.png|center|thumb|x100px|alt=LED Diagram https://learn.sparkfun.com/tutorials/polarity/diode-and-led-polarity|Raspberry Pi Header: https://learn.sparkfun.com/tutorials/polarity/diode-and-led-polarity]] | ||
| − | With this in mind I want you to use a black, female to male, wire to connect from the ground on the Raspberry Pi, to the negative line attached to the shorter side of the LED. | + | With this in mind, I want you to use a black, female to male, wire to connect from the ground Pin 6 on the Raspberry Pi, to the negative line attached to the shorter side of the LED. |
Now I want you to get a resistor and run the resistor from the positive line of the LED to a separate line I then want you to connect the circuit by running a red, female to male connection between the Raspberry Pi's GPIO 18 pin to join with this resistor. | Now I want you to get a resistor and run the resistor from the positive line of the LED to a separate line I then want you to connect the circuit by running a red, female to male connection between the Raspberry Pi's GPIO 18 pin to join with this resistor. | ||
Revision as of 01:38, 16 July 2020
The purpose of this lab is to introduce you to some very basic electronics and how we can integrate the Raspberry Pi. Please view this as a taster of a much larger area. The assumption is that you have already completed Install Raspbian get connected and basic networking.
Contents
Getting the packages
To get started, it is important that we have the Python packages that will allow us to manipulate the pins on the Raspberry Pi. For future-proofing, are standardizing all code on Python 3. So to complete this lab, you will need to install some packages:
sudo apt update
Then
sudo apt install python3-pip
After this:
sudo apt-get -y install python3-rpi.gpio
Turning on an LED
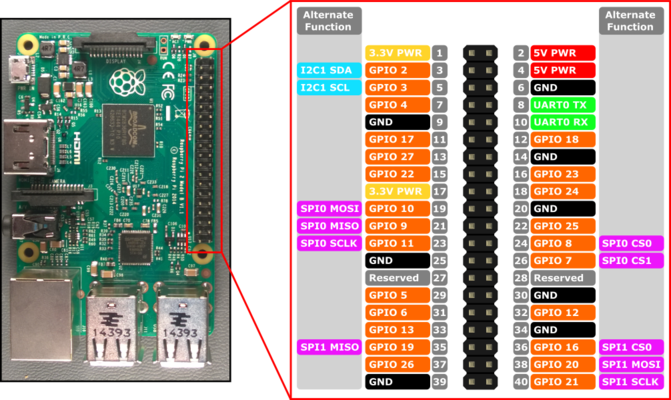
So in this first activity, I will show you how you can use Python code to turn on an LED in a Raspberry Pi. Start by watching the following video on breadboards: https://www.youtube.com/watch?v=fq6U5Y14oM4. First, we will do the wiring: carefully inspect the pinout of the Raspberry Pi below. This is the Pinout for the Raspberry Pi 3.
Physical wiring
Pick out one of your LEDs. Note that one side is longer than then other. The longer side is positive (red) and the shorter side is negative (black).

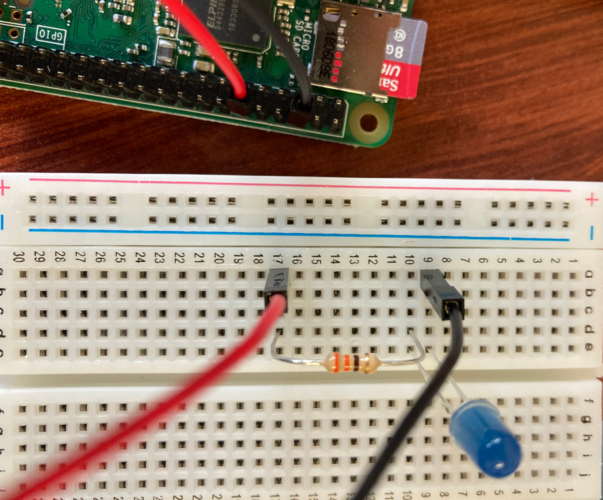
With this in mind, I want you to use a black, female to male, wire to connect from the ground Pin 6 on the Raspberry Pi, to the negative line attached to the shorter side of the LED.
Now I want you to get a resistor and run the resistor from the positive line of the LED to a separate line I then want you to connect the circuit by running a red, female to male connection between the Raspberry Pi's GPIO 18 pin to join with this resistor.
It may be better to try to copy the diagram below and then re-read the steps above for understanding.
The Python3 code
Now we will write the code to tun on the GPIO 18 Pin to switch on the light.
Open your favourite text editor on the raspberry pi:
nano led_light.py
Then insert the following code.
#!/usr/bin/python3

import RPi.GPIO as GPIO
import time

GPIO.setmode(GPIO.BCM)
GPIO.setwarnings(False)
GPIO.setup(18,GPIO.OUT)

print("LED on")
GPIO.output(18,GPIO.HIGH)
time.sleep(2)
print("LED off")
GPIO.output(18,GPIO.LOW)
Challenge
You should have a pack of LED lights and resistors. Can you write code to implement a basic traffic light system. Further task can you read about the breadboard's rails (see: https://learn.sparkfun.com/tutorials/how-to-use-a-breadboard/all) and then minimise the wiring to make this traffic light system work.
Save the code and then run it with:
python3 led_light.py
Wiring up the Pi and LEDs
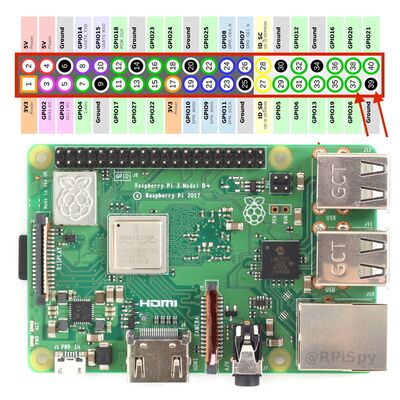
In the code above we have set the script to use GPIO port 26 (37) and then use any ground port of the Raspberry Pi in our example, we will use port 38.
The code above will turn on the port when 1 is written and turn off the LED when 0 is written.
Connect these header pins to a breadboard with jumper wires. Then connect the LED to the breadboard ensuring that the polarity of the LED is correct. LEDs have to be connected in the correct way, the longer lead is the positive side and the shorter lead is the negative side.

Now run the script again and connect using nRF connect and see if the LEDs will now turn on and off.
sudo python3 LEDscript.py
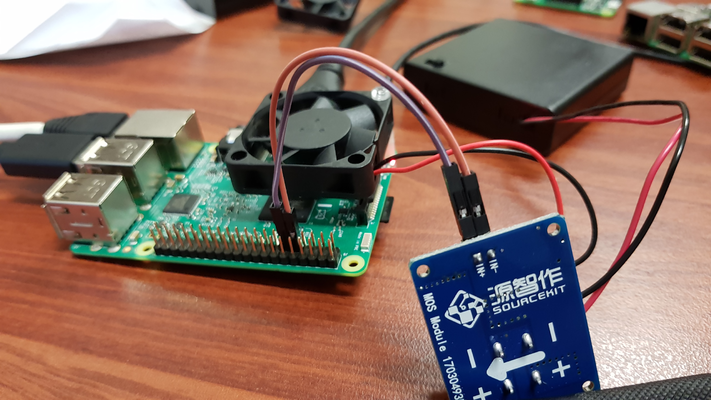
The wiring should resemble one of the diagrams below. Note that there is one output from the MOSFET to the fan and there are two inputs into the MOSFET from the Raspberry Pi. The reason is that the GPIO pins are not capable of producing the amount of current for turning the fan. A MOSFET is an electronic gate. We can use the GPIO Pin to turn the device on and off, while the power source may come from something external. If required we could turn a 240V circuit on and off in this manner.
If it is difficult to see the pins on the raspberry pi that is in use then you may refer to the diagram below.
Feel free to ask your instructor to check your cabling before moving on. Once you think your cabling is correct, you can attach the fan to the raspberry pi using the plastic standoff.
Basic code to operate the fan
Open up a text file, by clicking on the raspberry symbol in the top left, going to accessories,and slecting the text editor. Paste in or type the following code. Name the file fan.py and save it in the folder called pi.
import RPi.GPIO as GPIO
import time
GPIO.setmode(GPIO.BCM)
GPIO.setwarnings(False)
GPIO.setup(17,GPIO.OUT)
print "Fan on"
GPIO.output(17,GPIO.HIGH)
time.sleep(1)
print "Fan off"
GPIO.output(17,GPIO.LOW)
To run this program, you will need to open a terminal. Click on the black box at the top of the screen with a >_
You can then run the code in the terminal with the command:
python fan.py
If the fan does not turn, double check your cabling and ensure that the battery pack is switched on.
Can you modify this code so that the fan will turn on for 60 seconds?
Controlling the fan based on environmental conditions
We would like the operation of the fan to turn on to cool the CPU on your mini computer. The following command will show you the current temperature of your CPU
/opt/vc/bin/vcgencmd measure_temp
Read the following code and see if you can work out what is going on. Open a new file, paste the code below and save it as cooling_system.py
import RPi.GPIO as GPIO
import time
import os
import sys
import signal
import subprocess

GPIO.setmode(GPIO.BCM)
GPIO.setwarnings(False)
GPIO.setup(17,GPIO.OUT)
print "Fan test"
GPIO.output(17,GPIO.HIGH)
time.sleep(1)
print "Fan test complete switching off"
GPIO.output(17,GPIO.LOW)

temp = os.popen('vcgencmd measure_temp').readline()
print temp
temp= temp.replace("temp=","").replace("'C\n","")
print temp

while True:
    temp = os.popen('vcgencmd measure_temp').readline()
    print temp
    temp= temp.replace("temp=","").replace("'C\n","")
    print temp
    if float(temp) > 40:
        print "Temperature over 40C fan on"
        GPIO.output(17,GPIO.HIGH)
        time.sleep(2)
        print "Fan off"
        GPIO.output(17,GPIO.LOW)
    else:
        print "Temperature below 40C fan off"
        GPIO.output(17,GPIO.LOW)
        time.sleep(2)
Run the code, in a terminal with:
python cooling_system.py
Generating CPU load
We want to generate load on the CPU; paste the following code into a new text file.
n = 100000
p = 2

for p in range(2, n+1):
    for i in range(2, p):
        if p % i == 0:
            break
    else:
        print p,
print 'Done'
Same as before save it. You can call this primes.py as it will calculate all the prime numbers between 2 and 100,000. As before ensure it has execute permissions then run it with:
python primes.py
You should run it in a separate window, and you should be able to watch the temperature of the CPU increasing. You can stop the program with Ctrl+c, and the temperature should drop.


