Amazon EC2 Web Services
This lab will introduce you to Amazon EC2 web services. By the end of this lab you will have a virtual machine running at a location of your choosing and serving files via an Apache web server. In subsequent weeks we will link this virtual machine to DNS.
Lets go on a virtual tour of the Murdoch South st facilities: https://my.matterport.com/show/?m=LWNhTvtJsPB
This lab assumes that you have viewed the weekly videos and that you have an account with Amazon EC2. The lab is easier to complete using Linux as your home PC, if you would like a challenge, or plan on completing your final assignment from a Windows PC, try to complete this from your normal Windows or MacOS computer. Make sure you read the section at the bottom of this page for some guidance on how to do this.
Contents
Log in to the Amazon EC2 Management Console
To start the lab, log into the Amazon EC2 management console: http://aws.amazon.com/ec2/
For the purposes of the signup, being a Business or School and using your Murdoch email has had reports of the fewest delays with credit card checks.
Launch an Ubuntu Machine in EC2
- Launch a new instance (virtual machine)
- Follow the steps on the AWS site.
- Instance type - Pick a "free tier eligible" Ubuntu 20.04 Instance.
- Configure the instance details - You can leave everything as the default.
- Add storage - The default is to create a virtual machine with an 8GB hard drive. That's fine, leave it at the default.
- Add tags - There is no need to add any tags so continue to "Configure Security Group".
- Configure Security Group
- Security group name - Call it "ssh-and-web"
- There is an existing SSH permission that is needed to manage your remote server, that is fine.
- Click "Add Rule" and select HTTP (web) as the type. This allows web requests to be received by our server.
- Review and Launch
- There may be a warning that your server is "open to the world". That's fine, we are building a public webserver!
- If you are happy with the configuration, click "Launch".
- Create a new "key pair". AWS uses key files rather than a username and password to verify your identity when logging into your virtual machine. If you lose this file it is unlikely you will be able to mange your virtual machine so it is important to keep it safe. Give it a meaningful name like "webserver-key" so that you can identify it later.
- Launch Instance - Click on "Launch Instance" and your server will start. After this you can use "View Instance" to monitor it's progress.
Console Access to the Virtual Machine
Now that your server is running in the cloud you need to login to the command line of your virtual machine. If you select your virtual machine and click the "connect" button. Follow the instructions there to connect to your virtual machine from your desktop. The command provided works in both Linux as well as on Windows Powershell.
Install Apache
Once you have command-line access to your virtual machine, the apt repositories may be out of date. Before you install anything, it is often a good idea to update them with
sudo apt update
Install the Apache Web Server using:
sudo apt install apache2
Test by visiting your new webserver. On your machine sitting in front of you, you should be able to type the Amazon machine's IP into your web browser.
Copy files to the Webserver
Once the machine has been launched, modify /var/www/html/index.html to ensure that your page is unique. Browse to your web page using a web browser to ensure it is working. You can find the Public IP address of your webserver on the AWS console page and then paste that IP address into your browser.
If you would like to download files from the Internet straight to your machine, you can use wget.
As an example try:
wget http://www.eecs.berkeley.edu/Pubs/TechRpts/2009/EECS-2009-28.pdf
This command should download the weekly reading into your /home/ubuntu directory. You would then need to move it into the /var/www/html directory using sudo.
If you have difficulties accessing the file via a browser, here are some potential issues:
- At times Apache has changed the default directory from which it serves HTML. /var/www or /var/www/html are common. One way to find out where the files are being served from is to locate the existing "index.html" file and place your files in the same directory.
- Rights and ownership can also be an issue.
- Some Apache installs require the owner to be the user www-data.
- Check that there are Read rights to the file.
Create Links in index.html
Once these files have been uploaded, you should create links to each file by modifying the HTML in index.html. You can insert the following html into index.html as an example of how to create hyper-links to files.
<a href="filename.pdf">Click here</a>
You should ensure that the path for your pdfs matches the path that is shown below. Hint - you may need to add a directory and move some files around. Hints:
mkdir
mv
Test
Test your configuration. Get your lab partner to try to download one of your files. Alternately, try downloading a file via your smartphone or laptop.
Once you have done this successfully, congratulations! You can now access any of the files you uploaded from anywhere in the world. Please do be aware that the web page you have created is not secure and any materials that you upload onto that webpage can be viewed by anyone.
Challenge 1
- Try pinging some servers in different parts of the world. Look at the round trip time or latency. Does it match up with your expectations?
- What are some alternatives to Amazon EC2?
Challenge 2
If you have local files on your Linux machine then you can move them onto the webserver with the following command:
scp -i your_pem.pem file_to_upload ubuntu@[dns_entry_or_IP_address]:/home/ubuntu
This command will move file_to_upload into /home/ubuntu. Remember that SCP or Secure Copy is using the SSH port (22) to copy files. Once the file has been transferred to /home/ubuntu you can then move the file to /var/www/html/

Budgets and Costs - Super Important!
If you won't be using your instance anymore, you may wish to shut it down or terminate (delete) it to decrease the chances of inadvertently running multiple instances and incurring EC2 usage charges. It is easy to launch instances in different countries and not notice them running. Remember that cloud-based services are often billed on the run-time of your server. Be particularly careful if you launch an expensive instance featuring large memory, fast CPUs or GPU processors.
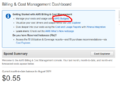
At the most simple level, you want to click on your name in EC2 and go to My Billing Dashboard. See the image to the right. You should be able to reconcile the costs that you see here.
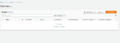
You will also want to set a budget, with an alert as well. Make sure that you follow the slideshow below, to set an actual budget and an alert. To get started click on your name in EC2 and go to My Billing Dashboard then look for the AWS budgets link, as indicated in the first image in the slideshow below. Then follow the text description below the slideshow to setup a budget with alerts.
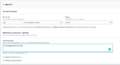
Click on AWS Budgets (Click on AWS budgets)
Click on create budget (Click on Create Budget)
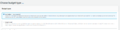
Choose cost_budget (Choose cost budget)
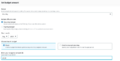
set a budget (Set a budget)
set an alert threshold (Set an alert threshold)

click_and_create_the_budget (Click and create the budget)


Using Windows
If you are going to use Windows as your home PC and wish to connect to or transfer file to or from you Linux based Amazon machine the using the Powershell command line works well. As an alternative, you could also choose to use:
- Putty https://www.putty.org/ for SSHing in
- WinSCP https://winscp.net/eng/download.php for moving file around
You will also likely need to convert your .pem key to a .ppk file. Please read the following for more information: