DNS
Contents
Overview
In this week's lab, we will acquire a domain name from your provider of choice, link it with the public IP address of your cloud machine, and then obtain a TLS certificate for free through Let's Encrypt.
A major objective of this exercise is to develop familiarity with the components that make up an "Internet Presence". A further goal of this unit is to empower students to build within the Internet rather than merely use it. You will only fully realise the objectives of this lab if you have total administrative control over your virtual machines and your domain name. At this point in the semester, we strongly recommend that students have their own account with a provider of their choosing. Some common choices are Amazon EC2, Microsoft Azure and Digital Ocean. Remember that another theme of this unit is that we want to show you approaches to solving problems, but we want to avoid heavily teaching any one tool where possible. This leaves you with the agency and option to choose the provider or tool that is best suited to you.
WARNING - Some cloud service providers won't let you use a country-code top-level domain (ccTLD) that is from an OFAC-sanctioned country. OFAC is a United States government department that is responsible for sanctions against other countries and are based on United Nations mandated sanctions in addition to US national security reasons and foreign policy. Current OFAC-sanctioned countries: https://worldpopulationreview.com/country-rankings/ofac-countries DigitalOcean - DNS QuickStart & How-Tos: https://docs.digitalocean.com/products/networking/dns/getting-started/quickstart/
Ensure you have access to a Cloud-based virtual machine
Launch an Ubuntu machine in your cloud service provided cloud. Ensure that you open SSH, port 22, HTTP, port 80 and HTTPS, 443, in the firewall. If you are unsure the lab Amazon EC2 Web Services or the videos in LMS that step you through Digital Ocean and Microsoft Azure.
The configuration of the virtual machine is not the focus of this lab. We recommend that you keep it simple so that we can move past this "revision element" and on to the substance of the lab. If you lack confidence in setting up a virtual machine, then redo the existing Amazon EC2 Web Services lab and commit some serious time to building your confidence.
If you are completing this lab at home or on your own, follow the steps for last weeks lab. Once your cloud-based virtual machine is configured and running you should ssh into the server and install the Apache webserver as follows:
sudo apt install apache2
- Record the Public IP Address of your cloud based virtual machine EC2: _________________________________________________
Open a browser and verify that your web server is running at that address. You should see the Apache welcome page. Do not continue with this lab until you have reached this step.
Obtaining and linking a domain name
Obtain a domain name from a Domain Name Registrar such as AWS Route 53, Namecheap, CloudFlare, Godaddy). Avoid leaving your credit card details or auto-renew on your domain name if you do not plan to use this domain name after this unit. With some providers, this is not possible. If this is the case, remember to terminate your account at the end of the semester. Paying with Paypal might be an option.
After you have purchased your domain name, you want to link it to your cloud machine. The most straightforward strategy from here is to create an A record pointing to your cloud-based machine's Public Internet-facing IP address. After these changes have been made, sometimes it will take a few hours for the DNS changes to propagate throughout the Internet. You should not proceed until you can verify that the domain name entered in a web browser URL goes to your website.
Testing
Can you now browse to the website? Can you enter your domain name into a browser and reach your page? If not, troubleshoot.
- Is the domain resolving correctly? (ping, nslookup) - Note: ping will not be successful unless a rule for ICMP has been added to the Security Group for your AWS Instance.
Experimenting
- Who issued the certificates for murdoch.edu.au and for csn.murdoch.edu.au? Don't assume they are the same group. Click the lock sign next to the URL to find out.
- Can you create an A record that points to another students server? You can use a subdomain.
- What happens if you create two A records with the same host name but different IP addresses?
- Point the host-name at your web server and a public site. Which one is resolved?
- Shutdown your server.
- Does the DNS eventually failover to the second IP address?
- How could this be used?
- Why does it take so long?

Budgets and Costs - Super Important!
If you won't be using your instance anymore, you may wish to shut it down or terminate (delete) it to decrease the chances of inadvertently running multiple instances and incurring EC2 usage charges. It is easy to launch instances in different countries and not notice them running. Remember that cloud-based services are often billed on the run-time of your server. Be particularly careful if you launch an expensive instance featuring large memory, fast CPUs or GPU processors.
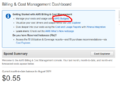
At the most simple level, you want to click on your name in EC2 and go to My Billing Dashboard. See the image to the right. You should be able to reconcile the costs that you see here.
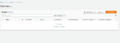
You will also want to set a budget, with an alert as well. Make sure that you follow the slideshow below, to set an actual budget and an alert. To get started click on your name in EC2 and go to My Billing Dashboard then look for the AWS budgets link, as indicated in the first image in the slideshow below. Then follow the text description below the slideshow to setup a budget with alerts.
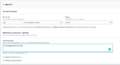
Click on AWS Budgets (Click on AWS budgets)
Click on create budget (Click on Create Budget)
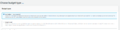
Choose cost_budget (Choose cost budget)
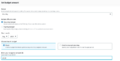
set a budget (Set a budget)
set an alert threshold (Set an alert threshold)

click_and_create_the_budget (Click and create the budget)


