Linux Essentials & VM Networks
In this lab, we will try to get you familiar with the Linux Command Line interface. This interface is found on many Internet servers, but also a lot of embedded IoT systems as well. If you do not have Linux in a virtual machine yet, you must go back and complete the Obtaining a Linux Environment lab.
After you have finished learning about the basic commands we will get you to create an additional Virtual Machine, network them so they can connect to each other and then teach you some SSH skills.
Contents
Basic Commands
Try out the following commands, If available, chat with your peers as you go.
ps -e
Then:
top
While you are looking at the information in top, press 1. What does this change? You can exit top by hitting "q". What are these commands doing?
Try the following:
ls
Then:
ls -la
What was the difference between these two commands?
Create a file with:
touch testfile
Then graphically edit it with:
gedit testfile
Add a message to yourself and then save and exit. Now try:
nano testfile
What is the difference between gedit and nano. Do you think you could use gedit if you only had a remote terminal prompt? Why/Why Not?
There are some other ways that we could view rather than edit a file. What is the difference between:
cat testfile
And
less testfile
You can hit "q" to exit. Lets look at moving files around. Try:
cp testfile testfile2
Now run:
ls
Then try:
mv testfile2 testfile3
Rerun:
ls
What is the difference between cp and mv?
Try:
ls -lah
How is this different from ls
Try the following:
uname -a
What do you think this tells us? How is this different from:
lsb_release -a
Now try:
hostnamectl
Finally, the following is a useful ls command:
ls -alt
Look carefully at the output, what does it do?
Super User
Both Windows and Linux feature different user levels. In Windows, the all-powerful user is the administrator. In Linux the equivalent is root. In both cases it is recommended that, regardless of your skill level, you should operate as a regular user until you need to elevate your privileges. This way you are being deliberate about when you are assuming the status of Administrator or Root.
Type:
whoami
This should echo back you username. Ok, lets try to do something that only the root user should be able to do. Lets try to add a new user. Type:
adduser [enter_a_new_username_but_omit_the_square_brackets]
You should find that the system responds to tell you that only the root user can do this.
Type
sudo whoami
A password will be requested. This will be the OS password that you logged in with. When you enter this, the system should respond with "root". Type:
sudo adduser [enter_a_new_username_but_omit_the_square_brackets]
You should now find that you can add a new user. Sudo is the current preferred way to temporarily become the root user on a Linux system, whenever you type sudo, you will be doing so with the privileges of the root user.
Network Configuration
Open a new terminal and type
ip a
Ping is a connectivity test that you can use to determine whether two devices are connected. If you are on the South St campus, can you ping your neighbour?
ping [neighborsipaddress]
If you are completing from home can you ping Google's DNS server
ping 8.8.8.8
Does it work? Why/Why not. Discuss with your peer about what this address might do and how it works. Click on the network icon in the top right of the screen. Explore the graphical network configuration options.
Hardware
Try the following commands.
lsusb
Then:
lspci
Then:
less /proc/cpuinfo
Discuss with your partner what these commands are showing you. How many cores does the computer have?
Find "About this Computer", which is located under settings in the GUI. Is it more or less useful? Which do you prefer?
Redirecting output to a file
We can redirect the output from a script or program, into a file. Try the following:
lsusb > output_of_lsusb
What do you think this is doing?
Try:
less output_of_lsusb
And
cat output_of_lsusb
What is the difference between "less" and "cat". How big is the file you just created?
ls -la output_of_lsusb
You can remove it with:
rm output_of_lsusb
Challenge
Run the following
cat /proc/cpuinfo
Ok, so now I want you to use grep, to only print the lines with the characters "GHz" in them.
Can you use cat, grep and redirect (>) to read and only insert the lines containing GHz into a file called speed.txt
Create a Second Virtual Machine and Network
Go back and create a second Ubuntu Server Virtual Machine Obtaining a Linux Environment.
Now we then need to ensure that your two machines sit on the same network. In the Virtual Box application click File->Preferences, then click on Network.
Then the add button on the right to add a network.
On each of your two virtual machines, go to Settings->Network. Within Network, change Attached to: Nat Network and then select the name of your NAT network.
Make sure that both your virtual machines are switched off, then switch them back on again.
Check their IP addresses with a:
ip a
See if the can ping each other
ping [insert_ip_of_other_computer]
If this works see if you can SSH between the machines. Type:
ssh [insert_ip_of_other_computer]
if this works then create a file on one computer:
touch file_to_be_copied
Then see if you can use scp to move it
scp file_to_be_copied [username]@[insert_ip_of_other_computer]:/home/[username]/
Challenge: SSH Keys
Generating and using SSH keys enable you to login without a password. Most importantly in the IoT, it enables us to write scripts to allow us to script and securely move files between machines with no passwords. Remember, if you write a script to scp a set of files twice a day, you aren't going to be there to type in the password and precoding the password in is a bad idea.
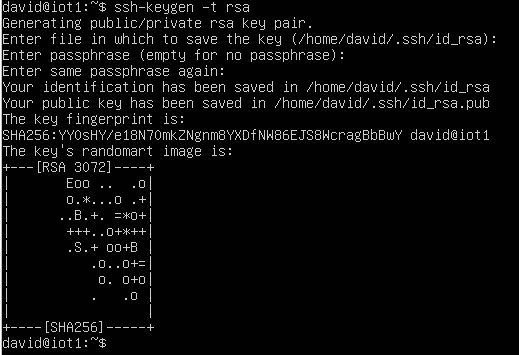
So we are going to create a public and private SSH key. To create the keypair, run:
ssh-keygen -t rsa
You can accept the defaults. Then cd into .ssh
cd .ssh
and examine the two files created:
ls -la
You should see that you have created two files id_rsa and id_rsa.pub. You can have a look at them with:
less id_rsa
and
less id_rsa.pub
The id_rsa file is your private key and id_rsa.pub is your public key. I generally use scp to transfer the public key another machine. I would use:
scp id_rsa.pub [username]@[neighborsIPaddress]:/home/[username]
This will put the file in the other computers /home/[username] directory
The text found within id_rsa.pub should be appended to the file .ssh/authorized_keys in the other machine. An easy on liner that works is:
cat id_rsa.pub >> .ssh/authorized_keys
This should append the recently transferred public key to .ssh/authorized_keys. If that file did not exist, then it would be automatically created.
After performing this operation, you should be able to login, from the machine that was transferred the public key, to the machine that ran ssh-keygen. Put your public key on any machine that you would like to automatically have passwordless login.
Extra Challenge 1
Don't stop here, once we have two Linux virtual machines that have passwordless entry, play with the scp command to move files between each machine. Experiment with the following:
touch crucial_data
scp crucial_data [username]@[neighborsIPaddress]:/home/[username]
Make sure this works. Now try:
sleep 20 && scp crucial_data [username]@[neighborsIPaddress]:/home/[username]
Extra Challenge 2
Get rid of the IP addresses. Edit the following file:
nano /etc/hosts
And add an IP address and a name for the machine that you frequently transfer files with. Re-complete Extra Challenge 1 using names rather than IP addresses.
Free time
If you find yourself with free time, then please work through Linux MOTD for your systems.


