Network Analysis Lab
In this lab, we will show you how to capture a user's network traffic using a Cisco 3550 switch. We will also show you how to analyse a network packet capture. The analysis of network performance, problems or artefacts is a very important skill for network professionals. In this lab, we will primarily focus on network forensic skills. Pay careful attention when cabling this lab and if you are unsure, seek help from your tutor.
Lab Setup
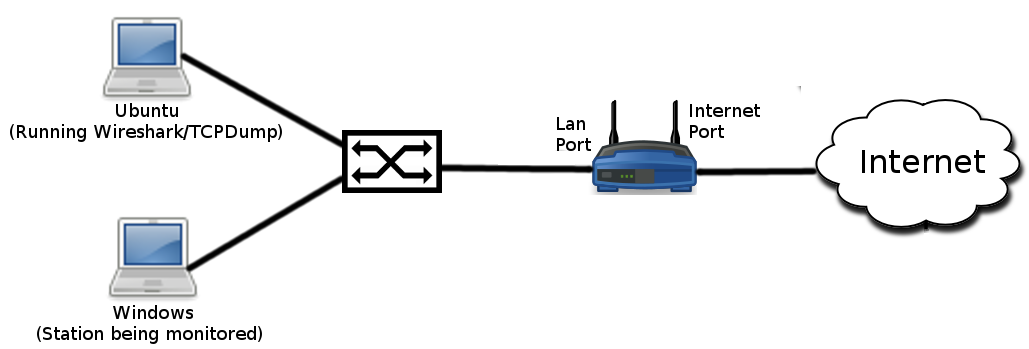
You should use the topology below:
Host setup
On the Ubuntu network monitoring station, use the GUI to set the Ethernet port to "Link-Local Only". This will prevent this host from trying to obtain an IP address automatically.
On the Windows PC, that is being monitored, you should receive an IP address via DHCP when the network is correctly configured. When you have a 192.168.1.x IP address from your DD-WRT router, then you can ssh to the gateway for Internet access.
Capturing frames moving over a Cisco Switch (SPAN port)
Ensure that you are using a Cisco 3550 or 3560 switch. Decide which interface you will capture traffic on and which interface you will send the captured traffic to. Then, to reset the config:
erase startup-config
reload
Then set the interface to capture on the switch.
configure terminal
monitor session 1 source interface [Interface_to_capture_on] both
monitor session 1 destination interface [Interface_to_send_captured_traffic_to]
show monitor session 1
Viewing and Storing Network Traffic
Your interface should now be able to see traffic from other stations. From your monitoring station in Wireshark. Please ensure that you are seeing traffic to/from the station you would like to monitor.
If you were monitoring a host 24*7 then you would use tcpdump. There are commands below to show how you would do that but for now, you can use Wireshark as our captures will be a reasonable size.
You can use TCPdump to save and store this traffic, but for our purposes today is probably easier to display everything live in Wireshark.
TCPdump:
sudo tcpdump -i [intx] -w /home/[username]/Desktop/capture.cap
In a separate window, you can use the following command to track how large the capture file is.
ls -la
Wireshark:
sudo Wireshark
Ensure that you capture on the computers ethernet interface.
Do 5-10 minutes of casual web browsing. Try to visit many different web pages as we are interested in what will be recoverable. Include a visit to http://www.murdoch.edu.au, http://www.abc.net.au/ and http://www.bbc.co.uk/ and type in some text into these websites, being mindful that your connection is being monitored. Then stop your packet capture and save the file as casualbrowsing.pcap.
Analyzing the Capture file
Reassembling Images
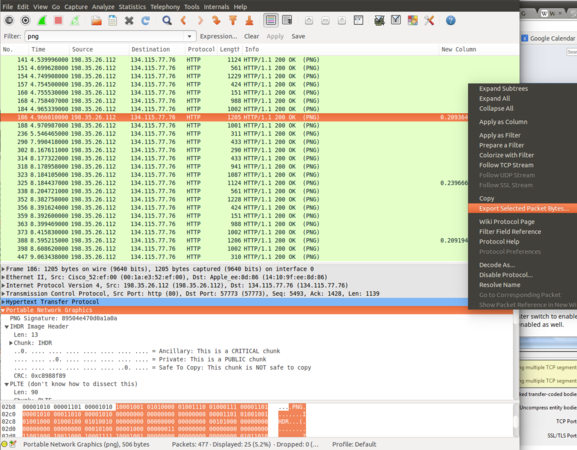
Once you have captured the data, try filtering on an image format, such as PNG. Click on one of the identified images, then right-click on the Portable Network Graphics line in the lower Wireshark window. Select Export Packet Bytes and save to the Desktop as image.png. Try opening your saved image. If you can't find a PNG, try the previous technique with other images types, for example, JPEG or GIF images.
Reassembling HTTP pages
Another way that you can reassemble pages and images is by clicking File->Export Objects->HTTP. You can then select the individual elements or save all of the captured content into a file.
Searching for Text
You might think that searching for data through Wireshark is very time consuming but the better you understand the tools, the faster you can find that needle in a haystack.
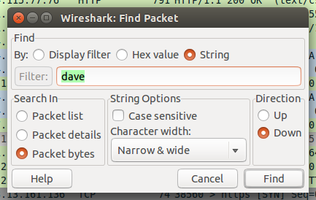
Start a fresh capture and visit http://pasted.co. Pasted is an anonymous site where you can paste text. You can then send the link for other people to see. Paste a message while capturing the transaction in Wireshark. You will need to submit you text while capturing then top the capture, and go to Edit->Find Packet. Then, find by String and Search Packet bytes. You can use the figure below as a guide. Enter a part of the string that you used in pasted.
You should be able to locate the string you used hidden in the packet. Take a close look at: https://transparencyreport.google.com/https/overview to see how quickly the web is transitioning to HTTPS.
DNS
If you cannot recover the images or websites from many HTTPS websites, remember that you can still look at the DNS record. Type DNS into the filter bar at the top. Does this provide a good idea of what your casual browsing session consisted of?
HTTP and HTTPS
At some stage, you probably would have visited Google.com and searched for something. Try to perform a string search on some text you have entered into google.com. Can you find it? Why/Why not?
Network Stats
Try to answer the following questions:
Remember that you can string filter scripts together using AND &&, OR ||, NOT !. If you do not know the name of an element that you wish to filter on then you can try to find it online, or, my preference is to find a single instance of that element in your packet capture then right-click->Prepare a filter.
- What is the distribution of packet sizes? Break into:
- < 500 bytes
- < 1000 bytes
- >= 1000 bytes
- What types of packets are small < 500 bytes and what types of packets are large > 100 bytes?
- What is the average packet size?
- What is the ratio of TCP UDP and ICMP segments in your capture?
- What percentage of your capture in encrypted?
- What TCP port is responsible for the majority of your network communications?
- Approximately how many TCP flows are opened when you browse to:
- amazon.com
- murdoch.edu.au
- google.com
Network Miner
Goto http://www.netresec.com/?page=NetworkMiner It is a native Windows program. Emulation is required on Linux. Take a look at the following: https://www.netresec.com/?page=Blog&month=2014-02&post=HowTo-install-NetworkMiner-in-Ubuntu-Fedora-and-Arch-Linux
Open your saved .pcap file in network miner and have a close look at what files have (not) been recovered from your browsing session. I tend to think that, while Wireshark is the swiss army knife of network analysis, for forensics based work, a Network Miner or commercial equivalent may be faster and more efficient.
Infrastructureless remote sniffer
The following is provided how it is possible to export the network data from a server to your own machine.
ssh root@firewall "tcpdump -s 0 -U -n -w - -i eth0 not port 22" > /tmp/remote


