Network Forensics with Wireshark
In this lab, we will primarily focus on network forensics skills. You will learn how to extract text and images from network captures. You will also learn how to apply SSL/TLS keys to decrypt these transactions. This lab assumes that you are using Ubuntu.
Contents
Viewing and Storing Network Traffic
Start Wireshark on your Ubuntu machine and start capturing on your primary network adaptor. You can use TCPdump to save and store this traffic, but for our purposes today is probably easier to display everything live in Wireshark.
Do 5-10 minutes of casual web browsing. Try to visit many different web pages as we are interested in what will be recoverable. Include a visit to http://iot.murdoch.edu.au/mediawiki/index.php/Main_Page and type in some text into the search field in these websites, being mindful that your connection is being monitored. Then stop your packet capture and save the file as casualbrowsing.pcap.
Analyzing the Capture file
TCP Reassembly
The packets that you have been capturing contain payload data. If we have an idea about the contents and file formats being transferred, and the transaction is unencrypted, we may be able to turn the binary data back into something recognisable. In this section, we are going to show you how to reveal elements of a webpage transaction.
Reassembling Images
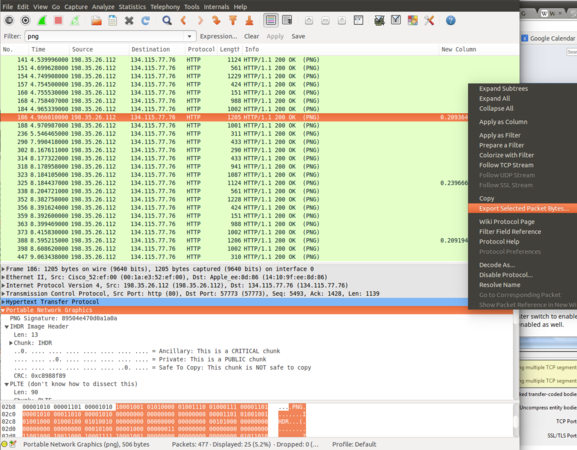
We can filter a specific image format, such as PNG or JPEG. You can do this by typing these words into the filter bar at the top of the page. Click on one of the identified images, then right-click on the Portable Network Graphics line in the lower Wireshark window. Select Export Selected Packet Bytes and save to the Desktop as image.png. Try opening your saved image.
Try the same technique with JPEG.
Reassembling HTTP pages
Another way that you can reassemble pages and images is by clicking File->Export Objects->HTTP. You will have to have stopped your capture to be able to do this. You can then select the individual elements or save all of the captured content into a file.
Searching for Text
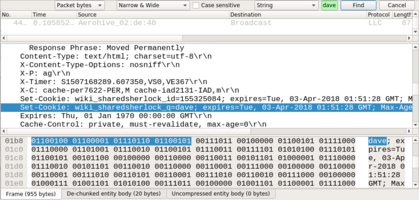
You might think that searching for data through Wireshark is very time consuming but the better you understand the tools, the faster you can find that needle in a haystack. Go to Edit->Find Packet. Then, find by String and Search Packet bytes. You can use the figure below as a guide. Enter a part of the string that you used in intsec-wiki.murdoch.edu.au.
You should be able to locate the string you used when searching the IntSec Wiki, hidden in the packet. Note that this is becoming increasingly hard to do, as the Internet is being encrypted by default. Take a close look at: https://transparencyreport.google.com/https/overview to see how quickly the web is transitioning to HTTPS.
DNS
If you cannot recover the images or websites from many HTTPS websites, remember that you can still look at the DNS record. Type DNS into the filter bar at the top. Does this provide a good idea of what your casual browsing session consisted of?
HTTP and HTTPS
At some stage, you probably would have visited Google.com and searched for something. Try to perform a string search on some text you have entered into google.com. Can you find it? Why/Why not?
Decrypting SSL/TLS
HTTPS relies on Transport Layer Security, previously SSL. This is what has been protecting the capture of all of our websites. There are a range of methods that can be used to decrypt it. I will assume a simple one, where you have access to the machine being monitored. So in this example, we will decrypt our own SSL/TLS transactions. Note that you can use Windows and here is a link on how to make that work, but these instructions assume that you are using ubuntu.
First, we want to set an environment variable:
export SSLKEYLOGFILE=/home/murdoch/sslkeylog.log
Note that if you are not working in the labs, the path will be different. You can make the path whatever you like. After you have set this environment variable, you should check.
echo $SSLKEYLOGFILE
To make this permanent, you can also add this to the end of ~/.bashrc. Then in the same terminal window, open a web browser
firefox
Vist a few websites using this browser window, then:
cat sslkeylog.log
You should a series of lines that look like:
CLIENT_HANDSHAKE_TRAFFIC_SECRET ad596600bb1b13027ed0500921c9e3a62e89c3f945d27d15ea08745ed105eb
SERVER_HANDSHAKE_TRAFFIC_SECRET ad596600bb1b13027ed0500921c9e3a62e89c3f945d2715ea08745ed105eb0e
CLIENT_TRAFFIC_SECRET_0 aa9f7a2e8d4ce8c19a7348002b219128824a011eb4663a9a3c9485788ed114ff
SERVER_TRAFFIC_SECRET_0 aa9f7a2e8d4ce8c19a7348002b219128824a011eb4663a9a3c9485788ed114ff4b4bda4c653ef00501c5109d4f
EXPORTER_SECRET aa9f7a2e8d4ce8c19a7348002b219128824a011eb4663a9a3c9485788ed1145cce06373f8bfdbae
Now open Wireshark, capture on your network adaptor and then do some more web browsing with the window that you had open. Please note that if you open the browser using the GUI menu then it likely won't start with the environment variable and will not log your keys.
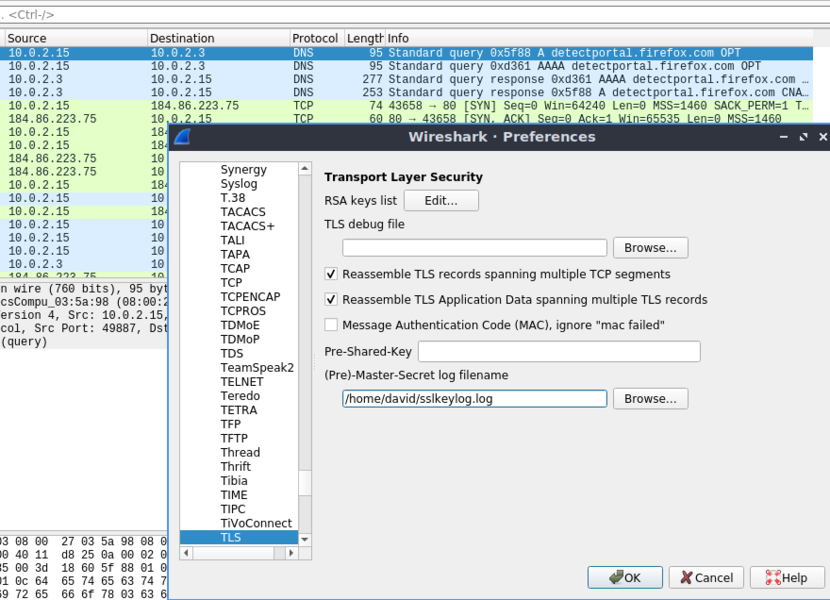
Once you have done some browsing you can filter using the SSL filter. Note that the transactions are encrypted. We now want to point Wireshark at your SSL keys file. Go to edit->preferences->protocols then find TLS. If you have the latest version of Wireshark it is now TLS rather than SSL. Follow the image below and point Wireshark to the location of your (pre)Master-Secret log file.
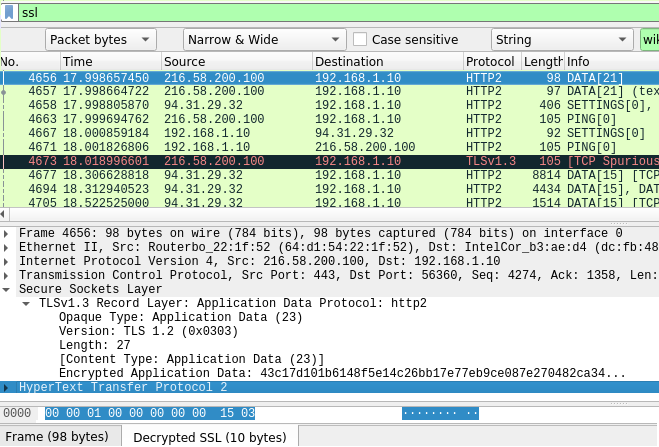
If everything has gone well you should now see all of your SSL transactions decrypted.
Searching Decrypting SSL/TLS
I have found that the packet search function falls over and doesn't work as I expect when searching on decrypted data. To search for text within decrypted data I would go to File->Export-Packet-Disections->As-Plain-Text
Once you have saved it in a file you can then use some more advanced tools and techniques for Searching Filesystems.
Network Miner
Go to http://www.netresec.com/?page=NetworkMiner It is a native Windows program. Emulation is required on Linux.
Open your saved .pcap file in network miner and have a close look at what files have (not) been recovered from your browsing session. I tend to think that, while Wireshark is the swiss army knife of network analysis, for forensics based work, a Network Miner or commercial equivalent may be faster and more efficient.


